 Ingest
Ingest / The guide
Your photos, from import to export.
Import a shoot, review your keepers, browse existing folders, and organize your finished exports. Jump to the tool you need, or use the Command Palette in the app to find an action by name.
Press ⌘K to search the site and docs.
Cards and folders
Put a card in and it appears in the sources list. A newly inserted camera card opens in Browse when Settings → Transfers → Open a card when it is inserted is on. Cards connected before launch remain available in the sidebar. Press ⌘O to open a folder instead. Available previews load progressively while Ingest reads the source.
Click the sidebar magnifier, press ⇧⌘F, or choose Find Folder in ⌘K to search folder names in a roomy palette. Results include parent paths; Escape closes the palette without changing the tree. Current, recent, and favorite folders appear immediately, with other results supplied by Spotlight.
The sidebar keeps your Mac’s folder tree in place. Single-click a folder to navigate in the current Browse tab; double-click to open it in a new tab. Command-W closes the current tab before the window. Favorites, Recent, and Saved Views have collapsible sections. Use Add to Favorites from the menu or command palette. ⌘D deselects photos. Show photos in subfolders is visible beside the folder name and defaults off; when enabled, selecting a photo identifies its containing folder. Finder’s Open With Ingest opens the photo’s folder and selects it.
⌘[ and ⌘] go back and forward through what you have opened, like a browser, so switching to the card and back to yesterday's folder costs one keystroke.
⌘E ejects. Ingest closes every file it has open on the card first, which is why eject does not fail with the usual complaint about a file in use. If a card disappears, Ingest closes the source and cancels an active import. Verified copies are retained; check the result for incomplete groups.
There is also a menu bar item, on by default, showing the progress of a running ingest, the cards that are in, and your recent folders. It is there so a copy can run while you work in another app.
Apple Photos, inside Ingest
Choose Apple Photos in the source sidebar and connect to your System Photo Library. Ingest requests Photos read/write access when you connect or send photos, not simply when it launches. It uses the library designated as the System Photo Library in Photos; it does not open an arbitrary library file.
Integration is on by default. Turn off Settings → General → Apple Photos integration to hide the Photos source, commands, send controls, and Photos actions. You can also disable it for individual workspaces in Settings → Workspaces. A workspace can use Photos only when the global switch is on. Your saved Photos review state and recipes remain available if you turn it back on. Finish an active Photos operation or import review before disabling it.
Use Library, Favorites, or an ordinary album to browse. Find albums narrows the sidebar while keeping matching folders and their parents. Search photos by filename, caption, or keywords; caption and keyword search requires macOS 27. Unfiled shows photos outside ordinary albums. Unreviewed tracks what you have reviewed in Ingest, independently of album membership.
The first search across a large library can take time as Photos supplies filenames and keywords. Your current photos stay visible while results are prepared.
Review and file a selection
Apple Photos uses the same browsing layout as files and folders. Choose Grid, Preview, or Split from the photo controls, or press ⌘1, ⌘2, or ⌘3. Preview includes a selection filmstrip; Split keeps the grid beside the preview. Space opens Preview and returns to the previous layout.
Click once to select a photo, use the arrow keys to move through the current view, and use Command-click or Shift-click to select several photos. Available image detail appears progressively; recently viewed previews are reused.
Photos stored on your Mac work without internet. If an older photo’s larger image is only in iCloud, Apple Photos must download it; a local thumbnail may appear first. That wait depends on your internet connection and Photos, not Ingest. For offline viewing, choose Download Originals to this Mac in Photos → Settings → iCloud and let syncing finish. This uses more storage. The info button beside the album title and Ingest Settings → General explain this limitation in the app.
The inspector shows basic photo information first, then loads expanded Histogram and Camera Details sections as needed. Opening Photos does not automatically start whole-library image analysis; choose Analyze Review Photos when you want it. On connection, you can begin browsing while Ingest prepares your albums. Unfiled and album organization become available when that preparation finishes.
Use the toolbar’s Sources and Inspector buttons, ⌥⌘S and ⌘I, to show or hide the sidebars. The right-hand inspector follows Settings → Sidebar information and includes tags, ratings, color labels, favorites, Photo Info, and album/review actions. Its histogram measures the current rendered Photos image. Choose a photo to see its information; widen the window if the shared layout has collapsed a pane to make room.
Select photos, then press G to add them to one or more albums. Press R to mark them reviewed, ⇧R to mark and advance, F to toggle favorite, or Space to preview. Ingest tags, color labels, and reviewed marks stay local. Favorites are native Photos changes.
Create albums and folders with the plus menu. Use a collection’s context menu to rename or move it. Within an editable album, ⌥⌘← and ⌥⌘→ move selected photos earlier or later. Pressing Delete removes photos from that album only. Delete from Library… is a separate action with confirmation; it removes photos from every album and follows Photos’ Recently Deleted and iCloud behavior.
Metadata and organization
Press M to review metadata changes. Favorites, capture dates, and locations work on supported macOS versions. Native captions, keywords, and star ratings require macOS 27. On earlier versions, ratings are local to Ingest; copying those ratings into Photos later requires an explicit review.
Choose Organize Photos into Albums to preview a grouping recipe, folder and album paths, manual assignments, and photo order. Apply adds photos to the reviewed destinations without removing unrelated album contents. Rules run when you apply them; they do not continuously synchronize. Shared Album publishing and native Smart Album rule editing are not included.
Send files to Apple Photos
Select files in a writable folder and choose Send to Apple Photos…. Review the album and import choices first. The default uses existing JPEGs or JPEG companions; files with no JPEG are reported as skipped. Choose RAW or RAW + JPEG explicitly when needed. RAW + JPEG creates separate Photos assets, not a paired asset. Ingest stages copies and verifies their bytes before importing, leaving the source files unchanged.
Memory cards must finish ingest and backups before sending. File-based Organize offers Send Groups to Photos…; a Photos post-ingest action opens the same reviewed flow. Browse JPEG Export can offer sending after export, and Social Export’s completion receipt can send finished JPEGs.
Import receipts reuse confirmed previous Ingest imports by content hash. This is not a scan for every duplicate already in your library. Open Photos Import History to reconcile an uncertain submission. Ingest does not silently retry a submitted import whose result is unknown or missing; Allow a New Import is an intentional retry that may create a duplicate. A successful import confirms addition to Photos, not completion of iCloud upload.
Use Photos in Social Export
Select stills in Photos and choose Send to Social Export… or press ⇧⌘E. Ingest keeps a durable local copy of each current rendered image for the project, along with its Photos reference. Cloud-only originals may need downloading through Apple Photos. Those retained project inputs are separate from the thumbnail cache.
Photos imports, album changes, metadata edits, and deletions can sync through iCloud if you have enabled iCloud Photos. See Photos privacy and storage.
Review decisions and protection
T tags the selected photos, or clears their tags when all are already tagged. R marks reviewed. Stars and labels stay independent. Use the visible Show: All / Tagged / Untagged / Selected controls to narrow the grid. More Filters adds capture dates, kind, and analysis. Before and After exclude the chosen day; Between includes both complete days.
Protect / Unlock Photos controls editing inside Ingest. Protected photos remain viewable and copyable, and disabled editing controls explain “Protected. Unlock to edit.” Mixed selections report protected exclusions. Keyword drafts stay open if a write fails.
Import… opens Import Settings. Its initial scope is Selected when photos are selected, otherwise All; choose Tagged explicitly for keepers. Display filters do not change import membership, and empty scopes stay empty. The eligible set freezes when copying starts. Protected originals remain protected; delete-copied cleanup requires verified, unprotected files. Import scope and verification →
Browsing, and why it is fast
Choose Grid, Preview, Split, or List from the photo-view menu. ⌘1, ⌘2, and ⌘3 select Grid, Preview, and Split. Press I to cycle photo information. The inspector provides Histogram, Camera Details, Caption, Keywords, and Location; choose and reorder its sections in Settings → Sidebar Information.
A raw file is large and slow to develop. Many cameras also write a finished preview inside that raw file for their own screens. Ingest finds that JPEG and reads only those bytes. The embedded preview can be much smaller than the RAW file; its size and resolution depend on the camera and recording mode.
Embedded previews keep ordinary browsing fast, with no import step before you can look. If a file has no usable preview or paired image, Ingest can render the selected photo in a separate helper and cache the result. That first fallback preview is slower; whole cards are not rendered in advance.
Arrow keys move, ⇧ extends the selection, and ⌘ with an arrow moves the focus ring without disturbing what is selected. ⌘+ and ⌘- resize the thumbnails, and so does a pinch.
Sorting and filtering
Sort and Group are separate controls. Clicking the active sort criterion reverses its direction; the adjacent direction button does the same. Group contains stack controls and Group by Day, Camera, Lens, ISO or Location, which puts photos under headings without filtering them. While photos are grouped, a bar above the grid names the group you’re in; click it, or any heading, to see every group with its count and jump to one. [ and ] move to the previous and next group, in the grid and in Preview. To narrow to one value instead, use the Metadata section of Filter.
Every workspace has left and right sidebar buttons, equivalent View-menu commands, and palette commands discoverable by typing “sidebar.” Hide either or both; each workspace remembers visibility and retains resized widths. Browse also supports Tab to toggle both.
Browse, Apple Photos, and Organize share photo controls appropriate to each context. Sort shows the current criterion and has a separate direction button. File views include capture time, filename, rating, color label, date modified, and file size; Apple Photos adds album order and Organize adds group order. Import Settings has its own photo scope and output preview.
Filter opens a panel rather than a menu: show all photographs or only the tagged, unmarked, or untagged ones; a minimum star rating; any combination of color labels; and a kind, such as brackets, singles, video, or new since the last import. Everything you have chosen appears as a row of chips under the bar, each with a cross that clears that one thing, beside a count of how many photographs are showing and a Clear that returns all of them. Saved views live in the same panel, and ⇧⌘S saves the current filter as a new one.
Photographs are ordered by when they were taken, down to the fraction of a second, so two cameras at the same event interleave correctly. A folder remembers the order you left it in.
Which files are supported, and what happens to the rest, is on the support page.
The preview
Space opens the large view, and Space again closes it. ⌘1, ⌘2, and ⌘3 switch between grid, preview, and both at once.
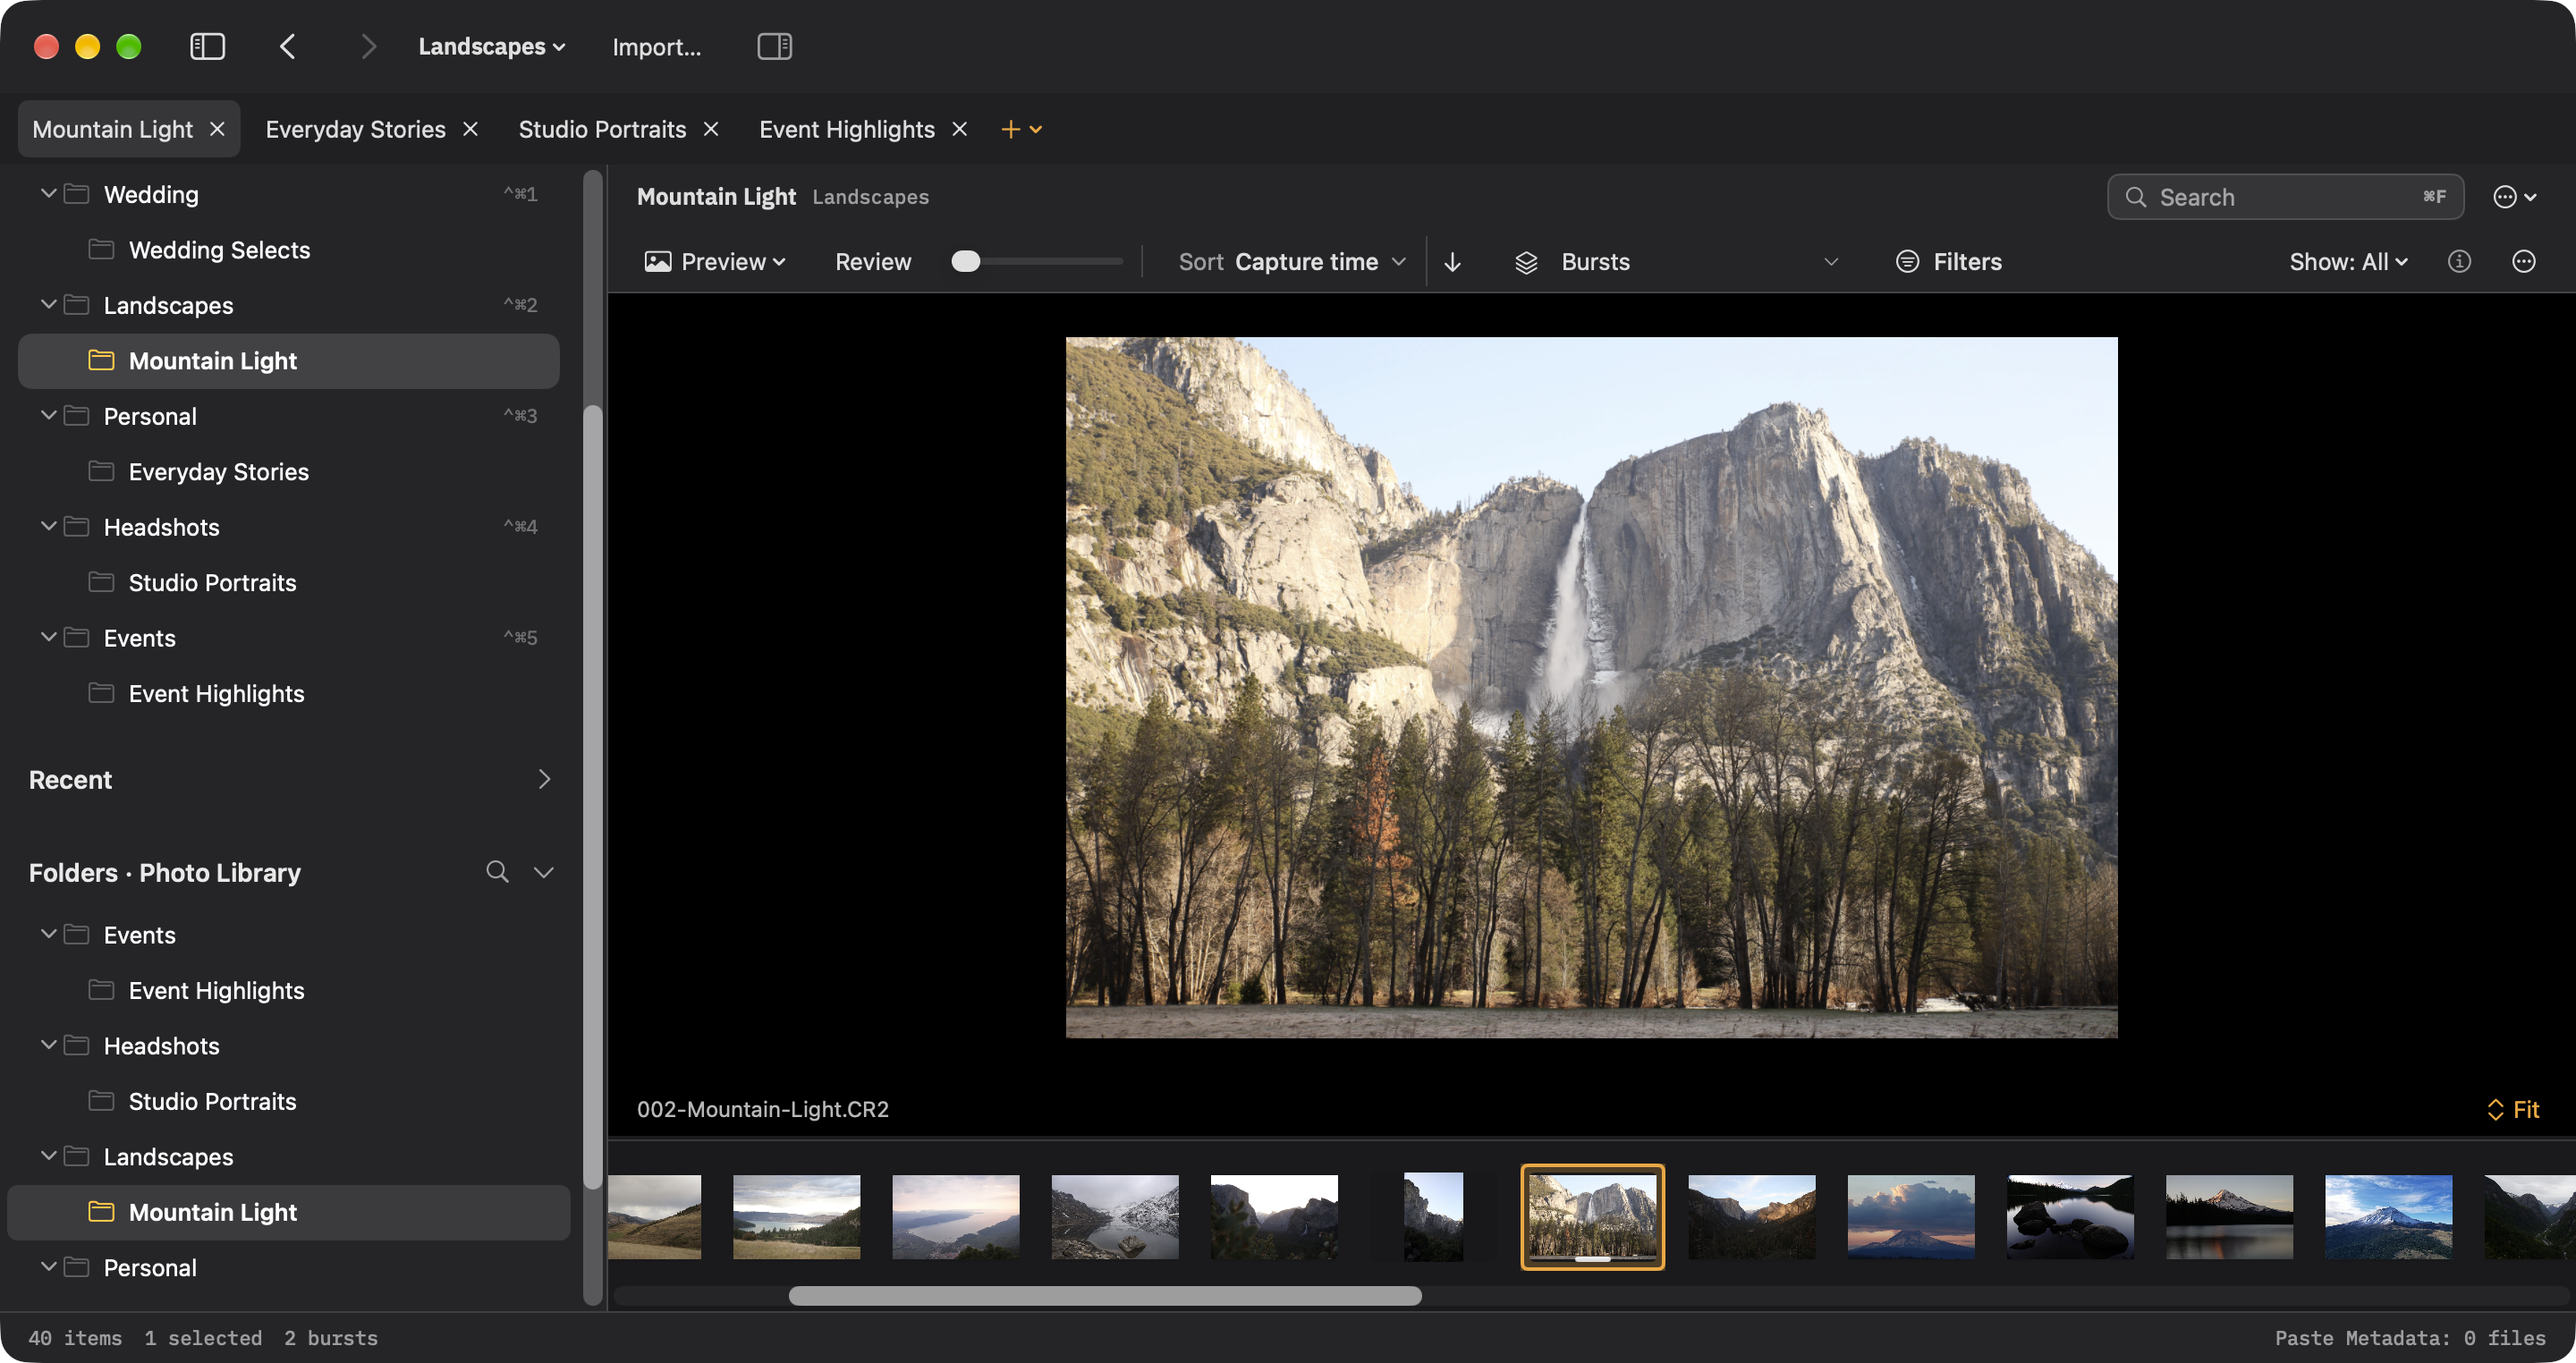
In the grid, hold Z over a thumbnail to show the loupe, then release to dismiss it. Hovering does not change selection. Loading or limited-resolution labels tell you when full detail is not available. The View menu can keep Grid Loupe enabled; Settings holds its size and magnification.
In Preview, Z goes to 100% at the pointer, so whatever is under the cursor stays under the cursor, and Z again returns to fit. ⌥1, ⌥2, and ⌥4 are fixed zoom levels, and ⇧F fits. F toggles Focus mode. A pinch, a two finger drag, and a two finger double tap do the same things.
The zoom is sticky as you move between photographs, which is the point: you set 100% on an eye, then arrow through five frames and compare the same eye in each.
In ordinary preview mode, at 100% Ingest shows the full size JPEG from inside the raw file, whose size depends on the camera and recording mode. When a raw file's preview is smaller than its JPEG twin, Ingest uses the twin, and the information overlay tells you which pixels you are actually judging.
Crop and straighten
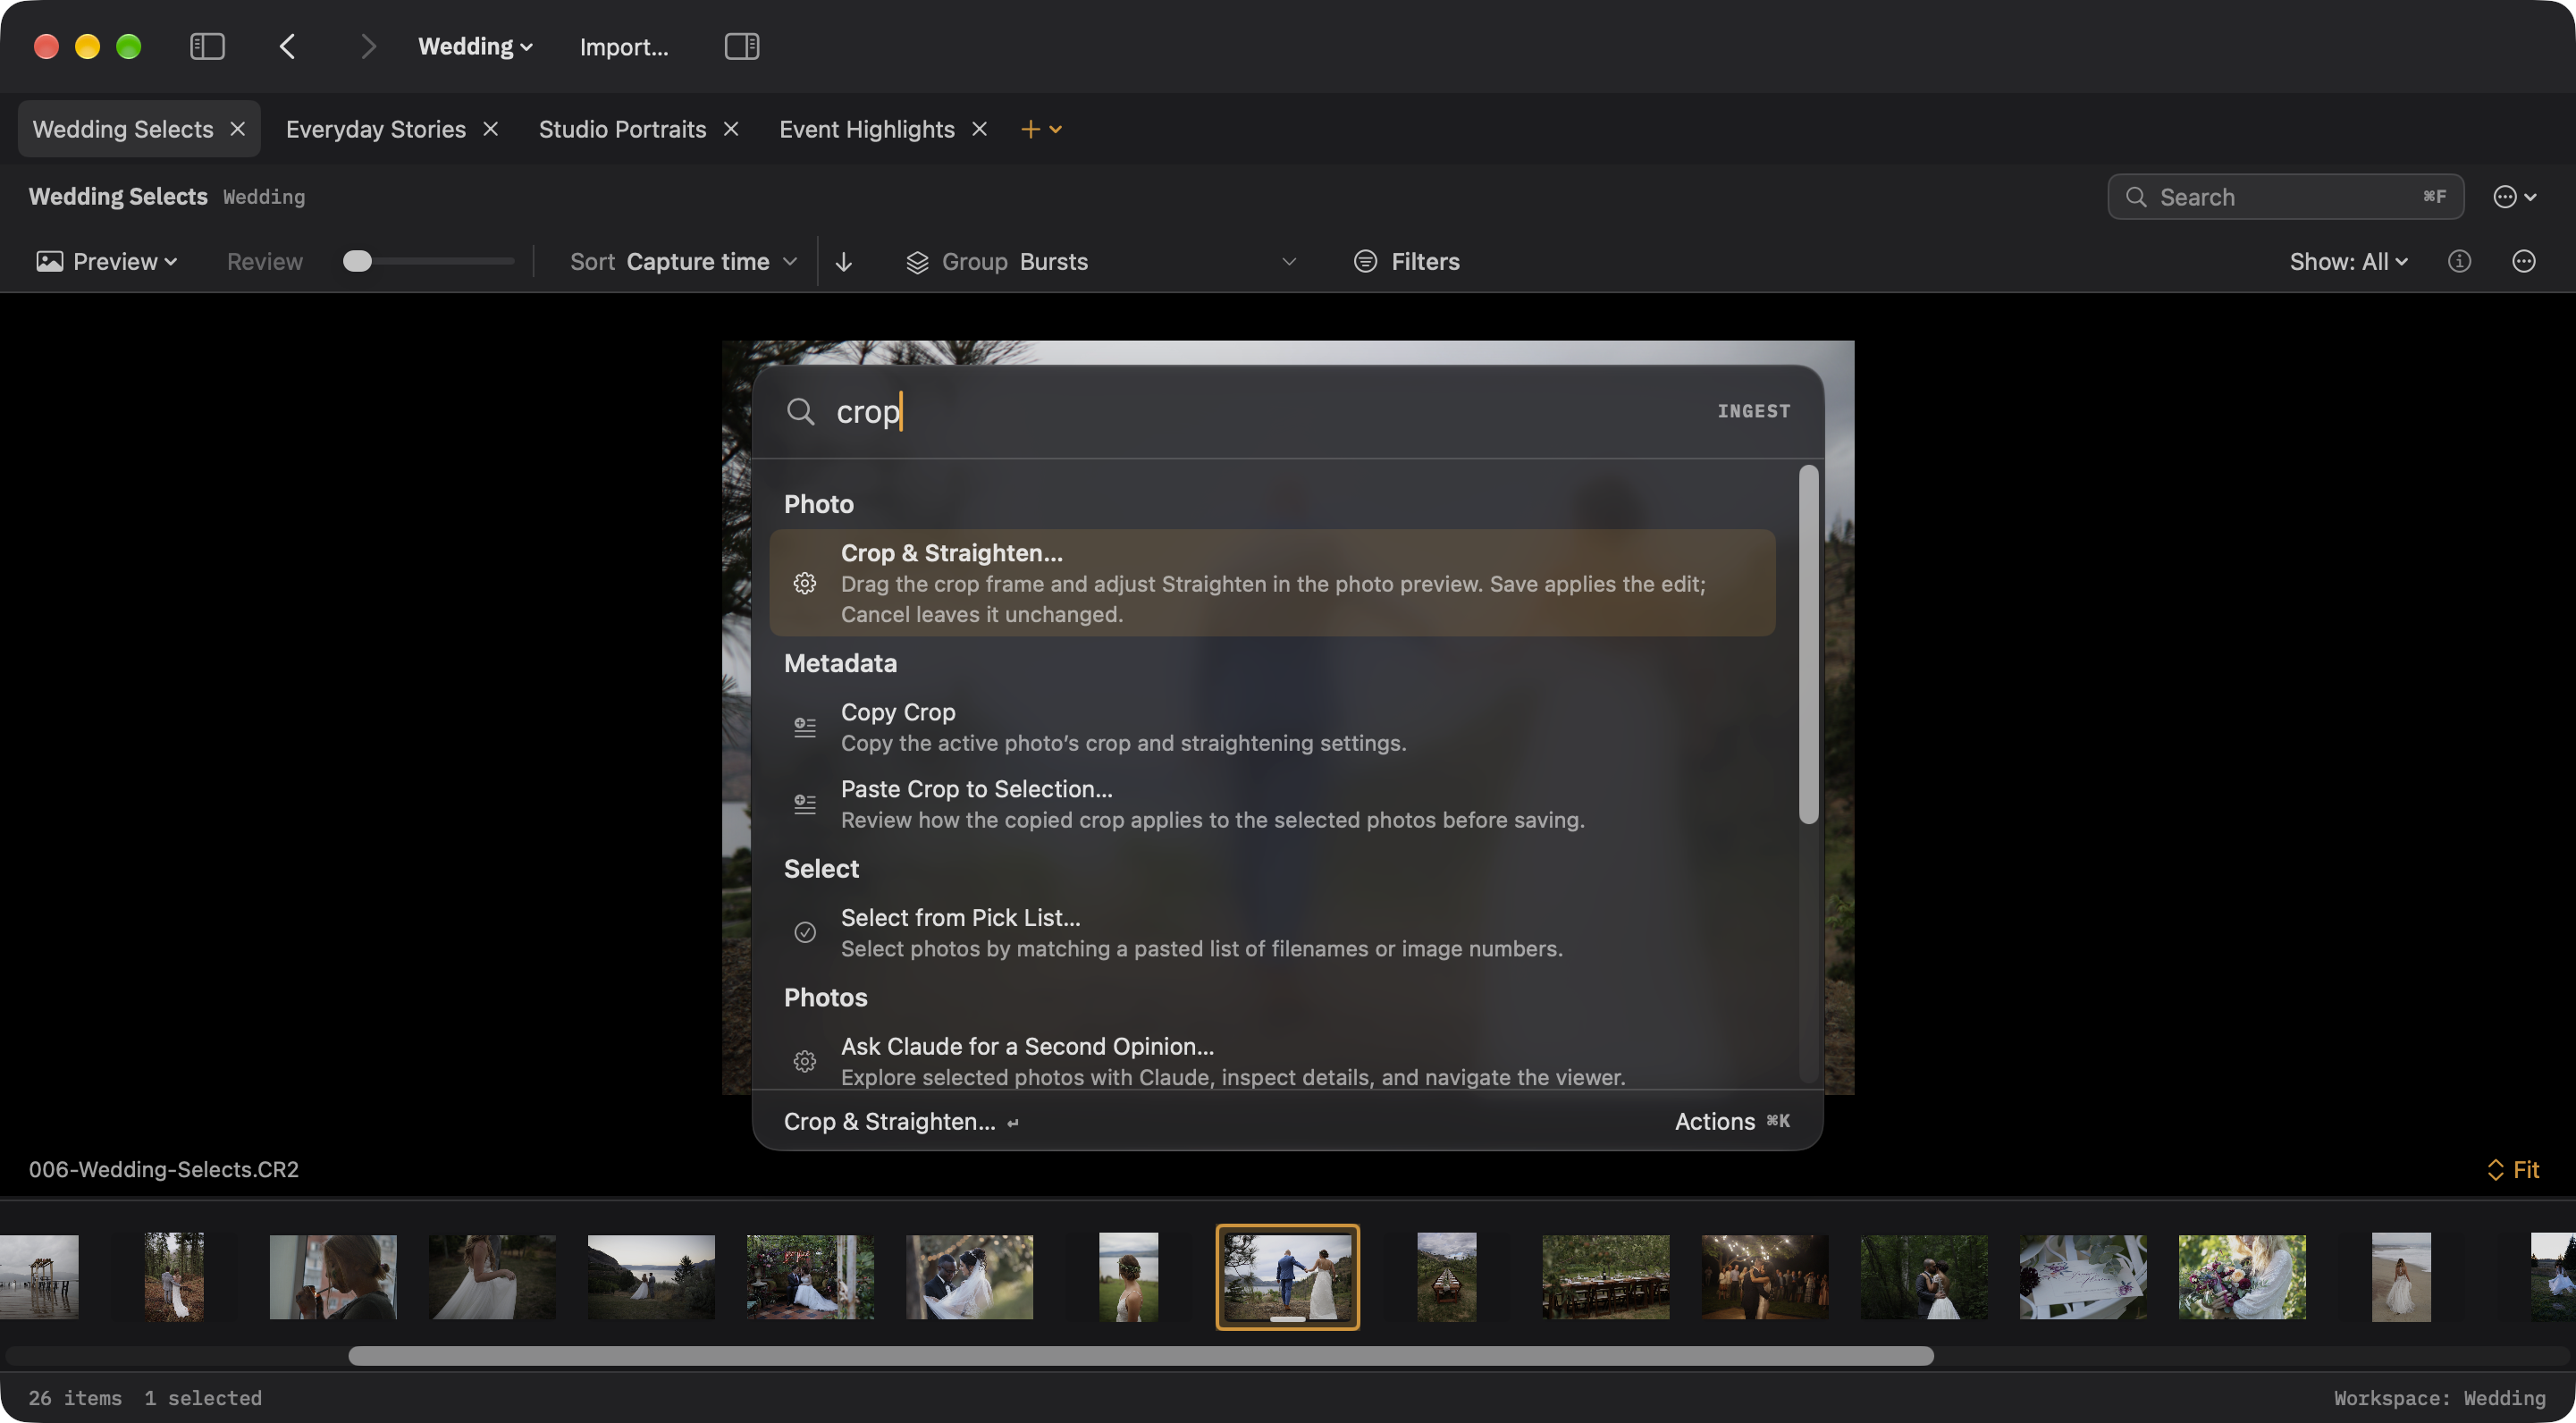
Select a writable photo and choose Crop & Straighten in Preview, the photo context menu, or ⌘K. Drag a frame corner to crop, drag inside to reposition, choose an aspect ratio, and use Straighten to adjust the angle. Save records reversible crop geometry; Cancel discards the draft. Copy Crop and Paste Crop to Selection reuse a composition after reviewing the affected photos.
Compare and survey
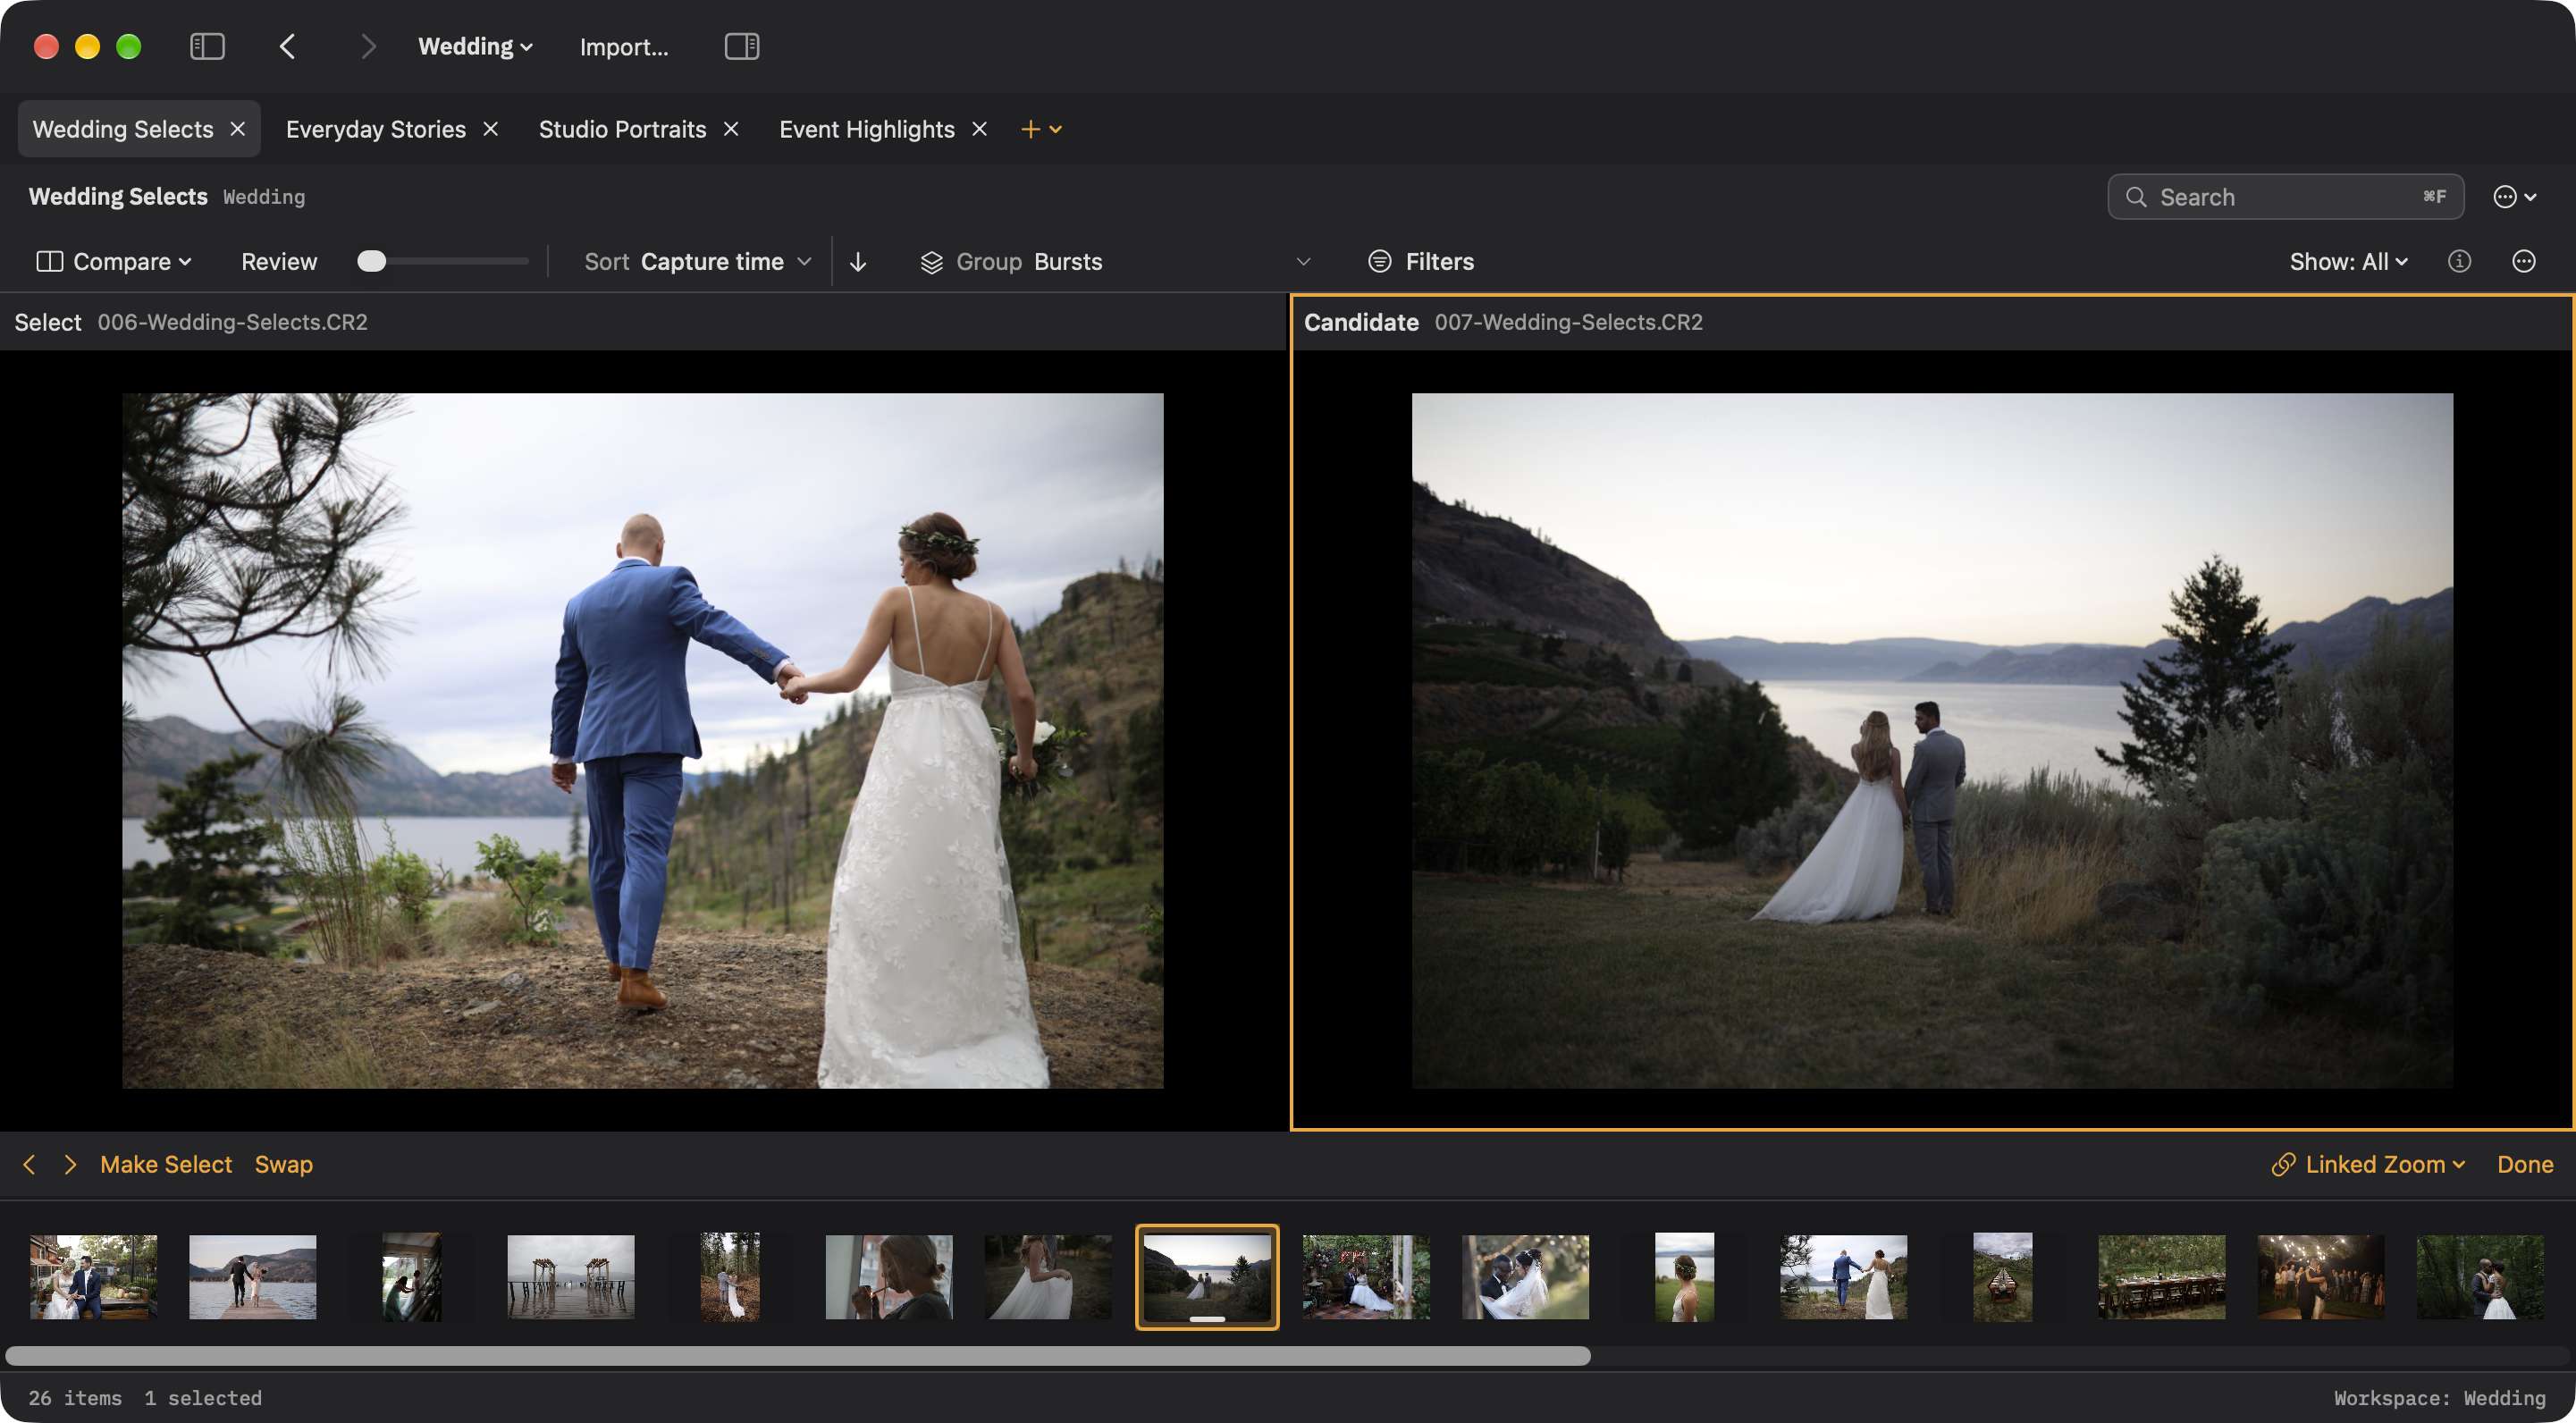
C opens Select on the left and Candidate on the right. Candidates come from an explicit multiselection, then the current stack, then the filtered source. Left/right changes Candidate while Select stays fixed; Up makes Candidate the Select and advances, and Down swaps the pair. Promotion does not tag a photograph.
Click either pane to choose the target for tag, rating, and label commands. The active border identifies that target. Linked Zoom keeps inspection aligned; turn it off to inspect each photo independently. Done or Esc returns to the preceding layout with Select selected.
N opens Survey: the whole current stack, twelve frames per page, or up to six selected photographs. Double-clicking a stack in the grid or filmstrip opens this same whole-stack view. Survey arrows stay within the set.
Hold B to temporarily inspect Select. Outside Compare, it uses the first tagged photograph in the current group. Releasing B restores the previous view.
RAW histogram and preview comparison
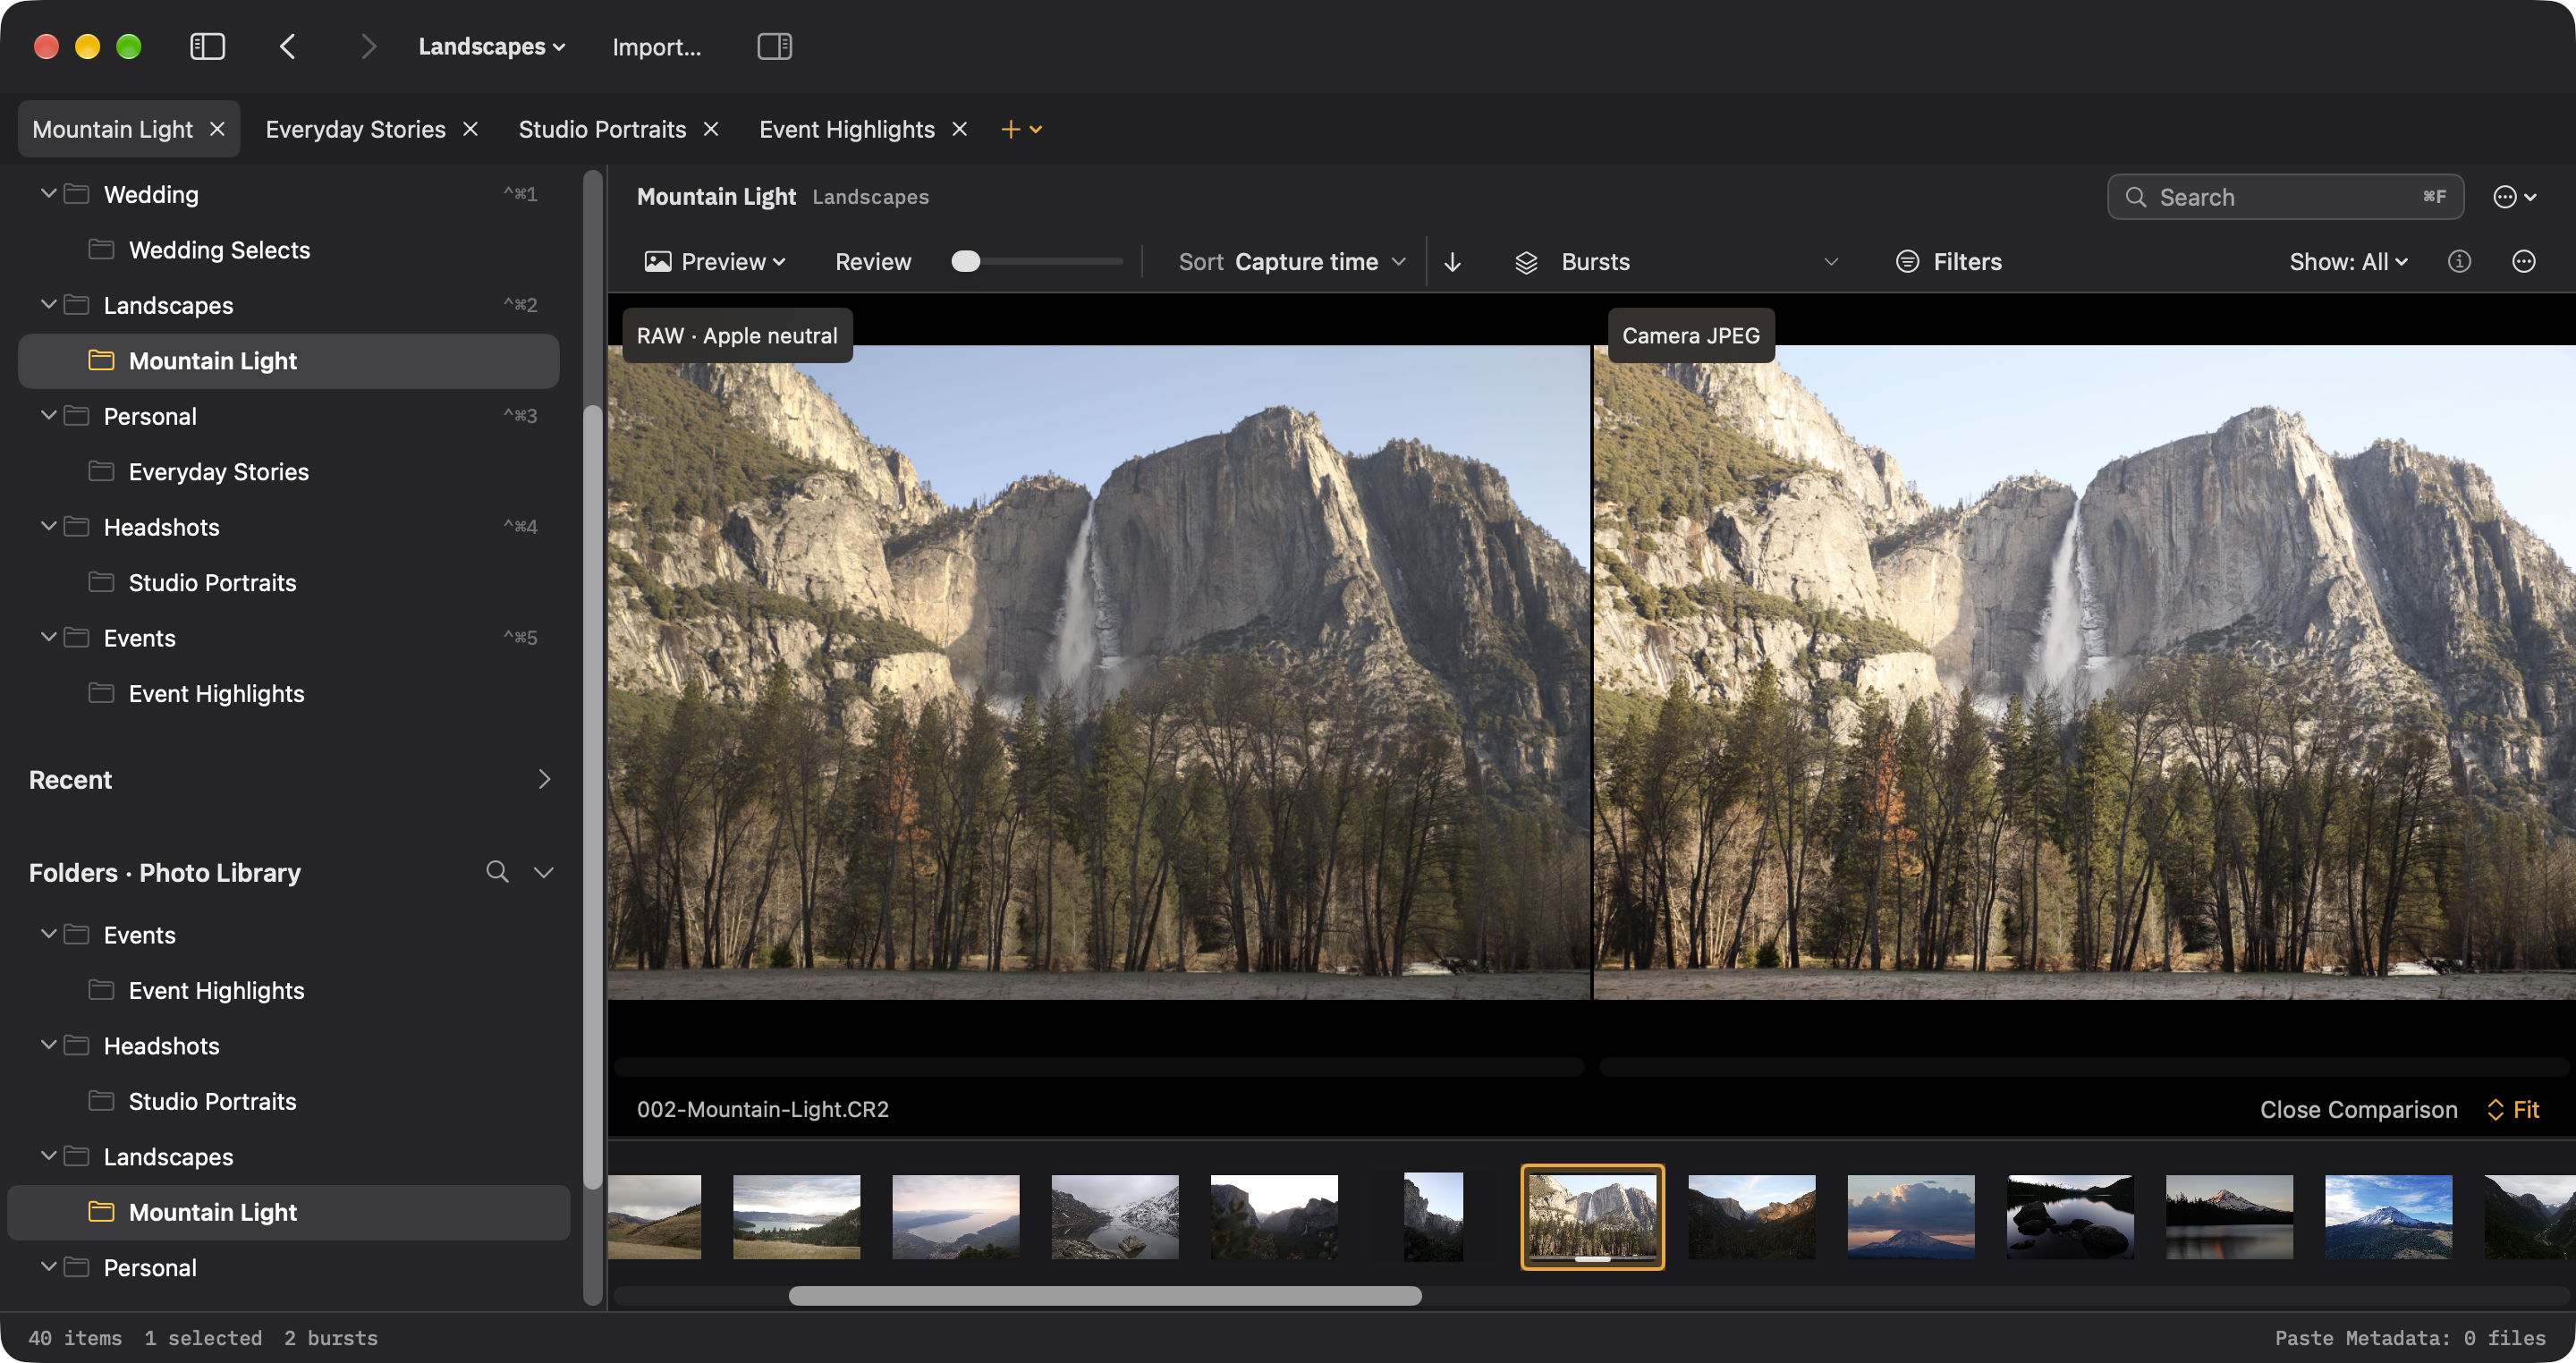
The inspector’s RAW / JPEG / Compare selector starts on RAW for each RAW photo. Supported Bayer and X-Trans sensor data, including DNG files with these mosaics, is read directly with black levels subtracted. White balance, demosaic, and rendering tone curves do not affect this histogram.
RGB curves remain visible by default. Use Combined / RGB / R / G / B to combine curves or isolate a channel. An individual RAW channel shows its headroom and clipped percentage. Both green photosite populations are combined, and channels are normalized so green does not dominate simply because the sensor contains more green photosites. Use Log (stops) / Linear to change the RAW scale (also available by right-clicking). The default runs from −16 stops to the white level at 0; its midpoint is −8 stops, only 0.39% of sensor saturation. JPEG charts use rendered tone values from 0 to 255, so horizontal positions in the two charts are not directly comparable. White balance and tone processing can make the JPEG reach white before the sensor saturates. Saturated values appear in a separate area at the right edge.
Highlight headroom measures the brightest channel’s 99.9th percentile against the camera/file white level, reducing the effect of a few hot pixels. Once 0.1% of any channel clips, the line changes to Clipped: 2.4%, for example. This percentage describes the channel with the highest clipped proportion, not a demosaiced pixel count. Clipping below the threshold still appears at the chart’s right edge. An entirely black signal shows “Headroom unavailable.” The measurement covers the active sensor area, independent of display crops.
JPEG selects a linear histogram of the paired JPEG, or the largest readable embedded JPEG when no readable JPEG companion exists. The source label’s tooltip identifies which file or preview is used. JPEG histograms do not report RAW highlight headroom.
Render RAW Preview, below the main photo or in the Command Palette, renders only the selected photo. The existing image stays visible while it loads. The photographic rendering includes camera white balance; it remains separate from the unrendered sensor histogram. Choose Show JPEG Preview to return.
Enable Show clipping on image to mark clipped regions for the selected channels and histogram source. RAW uses sensor saturation; JPEG uses full-resolution rendered values at 255. Each marker can cover several photosites so small clipped areas remain visible when zoomed out. Markers follow zoom, pan, orientation, and supported display crops. Camera JPEG crops or lens corrections can shift alignment with sensor regions. The overlay label identifies its source, including JPEG fallback. This display does not change exposure or the image file.
Compare above the histogram opens the same photo’s labeled RAW and JPEG previews side by side, with linked zoom and pan and full-resolution loading for 100% inspection. The RAW histogram remains available in the inspector. Close Comparison returns to the single preview. Navigating to another photo returns to ordinary preview loading. This differs from C, which compares multiple photographs.
If RAW data cannot be read, Ingest labels the fallback JPEG histogram and explains: “Couldn't read raw data for this file. Showing the JPEG histogram instead.” If no JPEG can be read, the module shows an unavailable state. Other rendered formats retain their own source labels. Unsupported sensor layouts and RAW compression variants use this fallback.
Calculation runs in the background and is cached by file revision. Loading holds the chart’s space; results fade in when ready. RAW rendering and analysis pause during ingest. These controls inspect exposure and rendering; they do not adjust exposure or assign ratings.
Overlays
I cycles the information panel: off, the exposure, then everything including the pixel size being displayed. That last part matters, because it tells you whether you are looking at a small preview or the full size image.
| Key | Overlay |
|---|---|
| I | Camera, lens, exposure, and what size image is on screen. |
| ⌥D | Detail. Turns the image into pure edge contrast, which makes soft frames obvious. |
| ⌥E | Edges, drawn in color over the photograph. |
| ⌥A | The focus point the camera recorded, when it recorded one. Sony and Fujifilm both do; Ingest explains when the information is unavailable. |
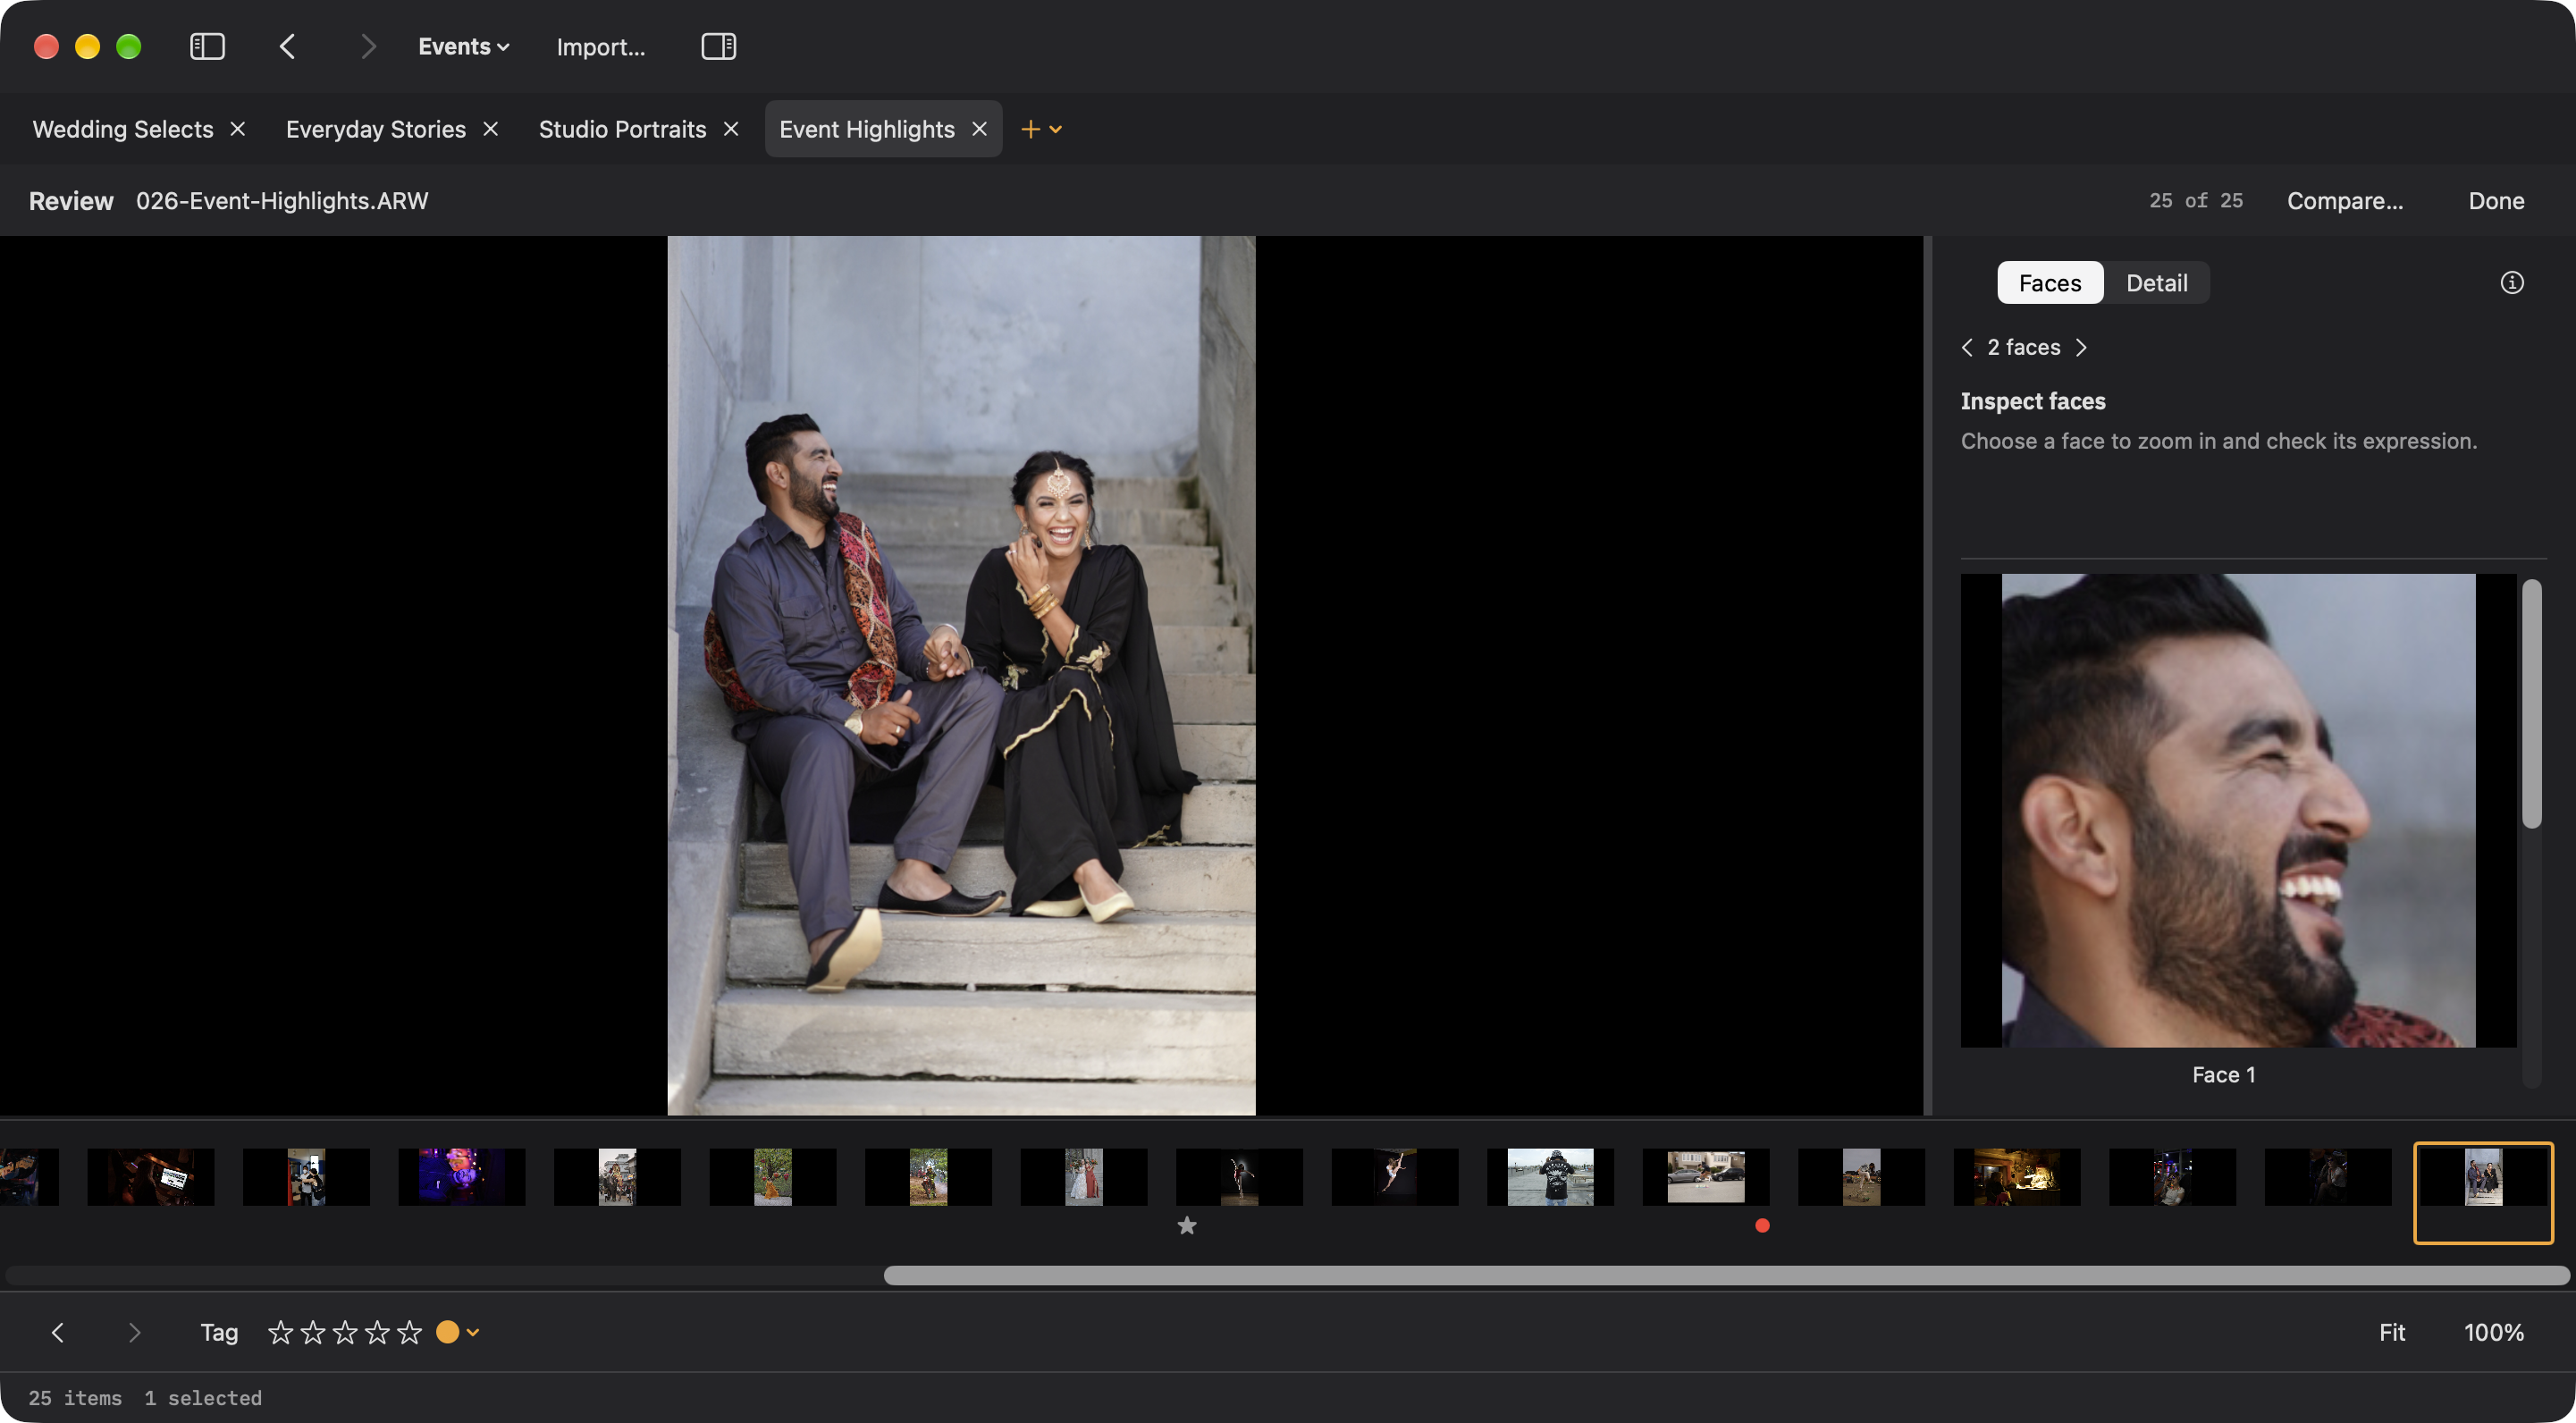
| ⌥F | Face close-ups along the bottom, each cropped at full size so you can check the eyes without zooming. |
Subject close-ups and culling analysis run locally using Apple’s Vision framework. Ingest caches face and subject regions, feature prints, and assessment results for inspection and similar-photo grouping. Corrections such as Sharp Enough and Intentional Closed Eyes persist locally. No names or identities are assigned, and analysis is not sent to a server.
Dark, low-contrast, and exposure-bracket frames can be unsuitable for a confident sharpness judgment. Ingest explains uncertainty instead of treating an unavailable assessment as acceptable detail. Use the detail or focus peaking to inspect the photograph yourself.
Burst stacks, scenes, and exposure stacks
Burst stacks keep one capture sequence together. Recorded identifiers and supported Sony sequence counters take priority. When that information is unavailable, Ingest uses a conservative maximum gap between consecutive frames from an identifiable camera, including its serial number. The default gap is two seconds, adjustable in Settings. Missing or uncertain evidence leaves photos separate. Framing changes do not split a recorded burst, and bursts have no 30-frame limit.
Scenes optionally organize related photographs from the same capture day, including later revisits. Different compositions can belong together, but uncertain visual matches remain separate. Scenes appear as sections containing individual photos, burst stacks, and exposure stacks.
In Group, enable Group by Burst, Group by Scene, either, or neither. Burst is on by default; Scene is off. Workspaces can save those choices. Exposure stacking stays independent. Double-click a burst for its whole-frame Survey; C keeps the two-pane Select/Candidate comparison. Previous/Next Burst controls appear while inspecting a burst.
Review Scene adds a removable scene filter to the existing browser. Use Previous/Next Scene to continue. There is no separate Review Similar Photos mode. Grid, Preview, Survey, and Compare retain their familiar roles.
Use Create Scene from Selection, Move to Scene, Combine Scenes, and Rename Scene through context menus or the Command Palette. Command-click scene headings to select several scenes. The confirmation shows the complete photo count, including intact burst and exposure stacks. Corrections persist locally, support Undo, and survive automatic analysis. They do not merge pixels, rename files, or change culling decisions.
For a burst, P adds the current frame as a keeper without removing existing keepers. Keep Only This Frame is a separate command. Photo Suggestions shows each burst or set of similar shots as its own section, the suggested photo marked and the reason in the header, and leaves out photos with nothing to compare; ↑ and ↓ move between sets, and nothing is tagged until you choose Tag. It never treats exposure brackets as competing candidates. Sort by Visual appeal orders a folder by the on-device appeal estimate, most appealing first, with photos not yet analyzed last; it is an order to look through, not a rating.
A three or five shot bracket is one picture taken several times. Ingest recognizes those sets and shows them as a single cell with a badge, so a card of a hundred brackets looks like twenty pictures instead of a hundred frames.
S expands or collapses the set you are on, ⌥S does all of them. A mark on a collapsed set applies to every frame in it, so tagging the bracket keeps the whole bracket.
Sets are found two ways. Sony writes a flag saying the frames were an auto bracket, which is definitive. Fujifilm does not, so Ingest looks for frames taken a fraction of a second apart with the same aperture and ISO and a clean spread of shutter speeds. Sets of three, five, seven, and nine are recognized, and an incomplete set is still stacked and marked as incomplete rather than quietly hidden.
If it gets one wrong, fix it. Select frames and combine them into a stack, or uncombine one. Your corrections are remembered for that folder. Exposure stacking can be turned off per folder with ⌥⌘K.
A RAW and JPEG / HEIF pair is handled separately: by default the two files show as one photograph, and marking or copying acts on both. ⌥⌘J turns that off for a folder when you want to see them apart.
Video
Clips sit in the grid alongside the photographs with a poster frame and their length. Space plays. J, K, and L shuttle the way they do in every editor, , and . step a frame, and M mutes.
↑ and ↓ always move to the next item rather than doing something to the video, so a clip never traps you in the middle of a cull.
Sony clips carry a small sidecar file with the real creation time. Ingest reads it, so clips sort into the right place among the photographs, and it copies the sidecar alongside the clip when you ingest.
Culling
Review a set of photos
Choose Review in Browse’s photo-control row, the photo context menu, or the command palette. Multiple selected photos form a fixed queue; otherwise Review uses the visible photos starting at the active photo. Videos are excluded, and marking does not remove photos from the queue.
A filmstrip navigates the queue. The resizable right column shows large Faces close-ups or the assessed Detail region. Click a face or use [ and ] to zoom to it; Fit returns to the whole photo. Corrections belong to individual faces or detail. Uncertain eyes are explained in the selected face’s details, rather than repeated under every thumbnail. Sharper eye reassessment runs for the inspected photo, not the whole folder.
Compare… holds a reference while the filmstrip chooses candidates; inspection and marks follow the active pane. Back to Review restores the prior photo, face, zoom, and inspection scroll. Done restores Browse or Suggestions with its selection, filters, and scroll position; your saved decisions remain.
Optional Second Opinion: find Ask Claude for a Second Opinion… in ⌘K for selected photos, or ask about the current folder or album. Review the scope, type a question, and choose Ask. It requires Claude Code and your Claude account, and sends requested previews and details to Anthropic. It can navigate your viewer but cannot change marks or files. What is shared →
Review entirely by hand or use optional built-in on-device assistance for eye and sharpness assessments, similar-photo evaluation, and keeper suggestions. You review and apply suggestions; opening them does not change your tags. Photo analysis stays on your Mac.
T toggles a tag and U removes it. Tag photos to find or act on them together. Stars, colors, and keywords are independent: 1 to 5 set stars, and pressing the current rating clears it. 6 to 9 set color labels, with ⌥9 for purple. R marks it reviewed.
By default a marking key changes the current photo without advancing. Turn on advancing in Settings → Browsing and the loop becomes one key per photograph: T to keep, → to skip. Holding ⇧ with any marking key does the opposite for that one press.
Use ⌘Z to undo review marks, batches of marks, and supported stack changes.
Tags live in Ingest. For writable folders, stars and color labels are saved in supported image files or XMP sidecars, so compatible editing apps can read them. Writes run in the background. On a memory card, Ingest keeps review changes locally and applies them to the copies during import.
Press Delete or right-click a photo to delete it. Confirmation is enabled by default; change it in Settings or in the confirmation dialog. All shows every photo in the current folder scope, and Untagged shows every photo without a tag.
Splits
The Filter panel offers All, Tagged, and Untagged, along with ratings, colors, Unmarked, and other filters. Unmarked means no tag, stars, or color. Your saved views remain in a collapsible sidebar section. Clicking the active filter beside the folder name clears it.
The counts update as you mark, which turns culling into something you can see the end of. ⌥Tab steps through the splits.
Set up a filter you like and press ⇧⌘S to save it as your own split. Settings → Browsing → Filters lets you edit one, give it an icon, or hide the built-in ones you never use.
Filters behave: they survive going in and out of the preview, they wrap where you expect, and marking the last photograph out of a view returns you to everything rather than leaving you in an empty room.
Fujifilm recipes
When browsing files and folders, select a Fujifilm JPEG to see Fujifilm Recipe below Location in Photo Info. Its collapsed heading shows the detected film simulation. Expand it to read the camera’s recorded settings or saved notes. Copy, Export, Edit, and the keyword action sit above the details. Choose Edit to change the text; Save, Cancel, and Use Camera Settings stay above the editor. JPEG companions in RAW + JPEG pairs work too.
If the photo already has saved notes, Ingest displays them as written. Otherwise, it prepares an unsaved draft from the recognized simulation and available white balance, tone, color, grain, and other settings. It leaves missing settings out and does not guess unknown simulations or custom recipe names.
Edit or replace the entire text, then choose Save to keep it with the JPEG. Cancel restores saved notes or the detected camera settings. Use Camera Settings restores the detected recipe while editing. Viewing a recipe does not write metadata. Recipe notes share the Instructions field with the full metadata editor. On a card, Save opens a short dialog to queue the notes for after ingest.
Copy copies the text currently shown. Export saves it as a .txt or .md file, including unsaved edits. These are files for sharing and reference, not profiles that can be loaded onto a camera.
Add “Provia” to Keywords names the simulation it will add. The button changes to a checkmark and confirmation when the keyword is present. Existing keywords stay in place and duplicates are avoided. With multiple photos selected, each qualifying JPEG gets its own simulation keyword; select one qualifying JPEG to edit recipe text. Recipe saves and simulation keywords affect only JPEGs, including in RAW + JPEG pairs.
On a card, recipe saves and simulation keywords are queued only after you confirm the dialog. Choose Don’t show again to skip future card recipe confirmations. Turn them back on with Confirm card recipe changes in Settings → Sidebar Information → Fujifilm Recipe. Queued changes are kept on your Mac, survive restarting Ingest, and apply to verified JPEG copies at both destinations after the ingest preset. Undo removes a queued change. Card originals and RAW companions stay untouched; Copy and Export work immediately. A queued change remains associated with its source photo for subsequent ingests until you undo it.
Use Settings → Sidebar Information to hide or reorder the section.
Metadata
Photo Info keeps Caption, Keywords, and Location close at hand. Its menu opens the full IPTC editor when you need specialized fields. Choose and reorder sidebar fields in Settings → Sidebar Information. Ingest writes supported rendered files directly and uses XMP sidecars for proprietary RAW files. Export a JPEG with metadata and GPS included for apps such as Apple Photos that may not read RAW sidecars.
Use Suggest… beside Caption or Keywords for on-device Apple Intelligence suggestions on supported macOS 27 systems. Review each photo, edit the suggested text, and choose what to save. Nothing is written until you approve.
Location accepts address/place search, decimal latitude and longitude, an Apple Maps link containing coordinates, or just city and state. Camera location describes where you stood and can set the GPS used by map apps. Place in the photo describes the subject location; photographing a skyline from across a river is one example where they differ. Saving only place names leaves GPS unchanged.
Open the inspector with ⌘I. K opens Keywords. ⇧C goes to the caption. ⇧K takes back the keywords you just added, which is the one you will want after applying the wrong thing to forty photographs.
Every write is checked. Ingest keeps the tool's backup of the file until it has read the file back and confirmed the new value, then removes the backup. If the read back does not match, the original is put back. That is why writing metadata to a hundred files takes a moment.
Never to a card. Camera originals are never modified. Set metadata in the ingest flow to apply it to verified destination copies.
Focus Peaking (⌥E) overlays green edge highlights while preserving the original color and brightness. It is not a complete map of focused areas: low-contrast detail can be sharp without a highlight. Toggle it off and inspect the original at 100% before deciding.
Edit Metadata… opens Metadata Assist. Choose Edit Individual Fields… inside it for the detailed field editor. Use Changes returns that draft to the review panel; only Apply applies the reviewed changes.
Metadata Assist
Camera and lens details for film scans
Choose Camera & Lens… in Metadata Assist. Pick saved equipment from My Gear, search the offline camera/lens catalog, or save a custom make and model. Enter known aperture, shutter speed, ISO, and focal length; leave unknown details blank. Shutter speed accepts a fraction such as 1/125 or seconds.
Fill missing values preserves recorded metadata. Choose Replace recorded values when the scan describes the scanner instead of the taking camera. Review Details returns to Metadata Assist before Apply. JPEG/TIFF edits and RAW sidecars use verification and Undo. During ingest, the details go to verified copies. My Gear is saved on this Mac and does not yet sync with Ingest Field.
⌘’ opens Metadata Assist for selected photos or the current import. Choose Keywords, Caption, or Location to begin, or type ; to see your field options, pick one (a fragment like ;lo narrows the list), then Tab to take it and fill the value or search for a place. Separate keywords with commas.
;
;lo
;capt
Recognized fields appear immediately in the review panel. Correct a value, add another field, inspect existing values, or change its operation. Keywords append by default; most other fields begin with Replace. Fill Empty and other operations depend on the field. Unrecognized input and caption-code errors remain visible until resolved.
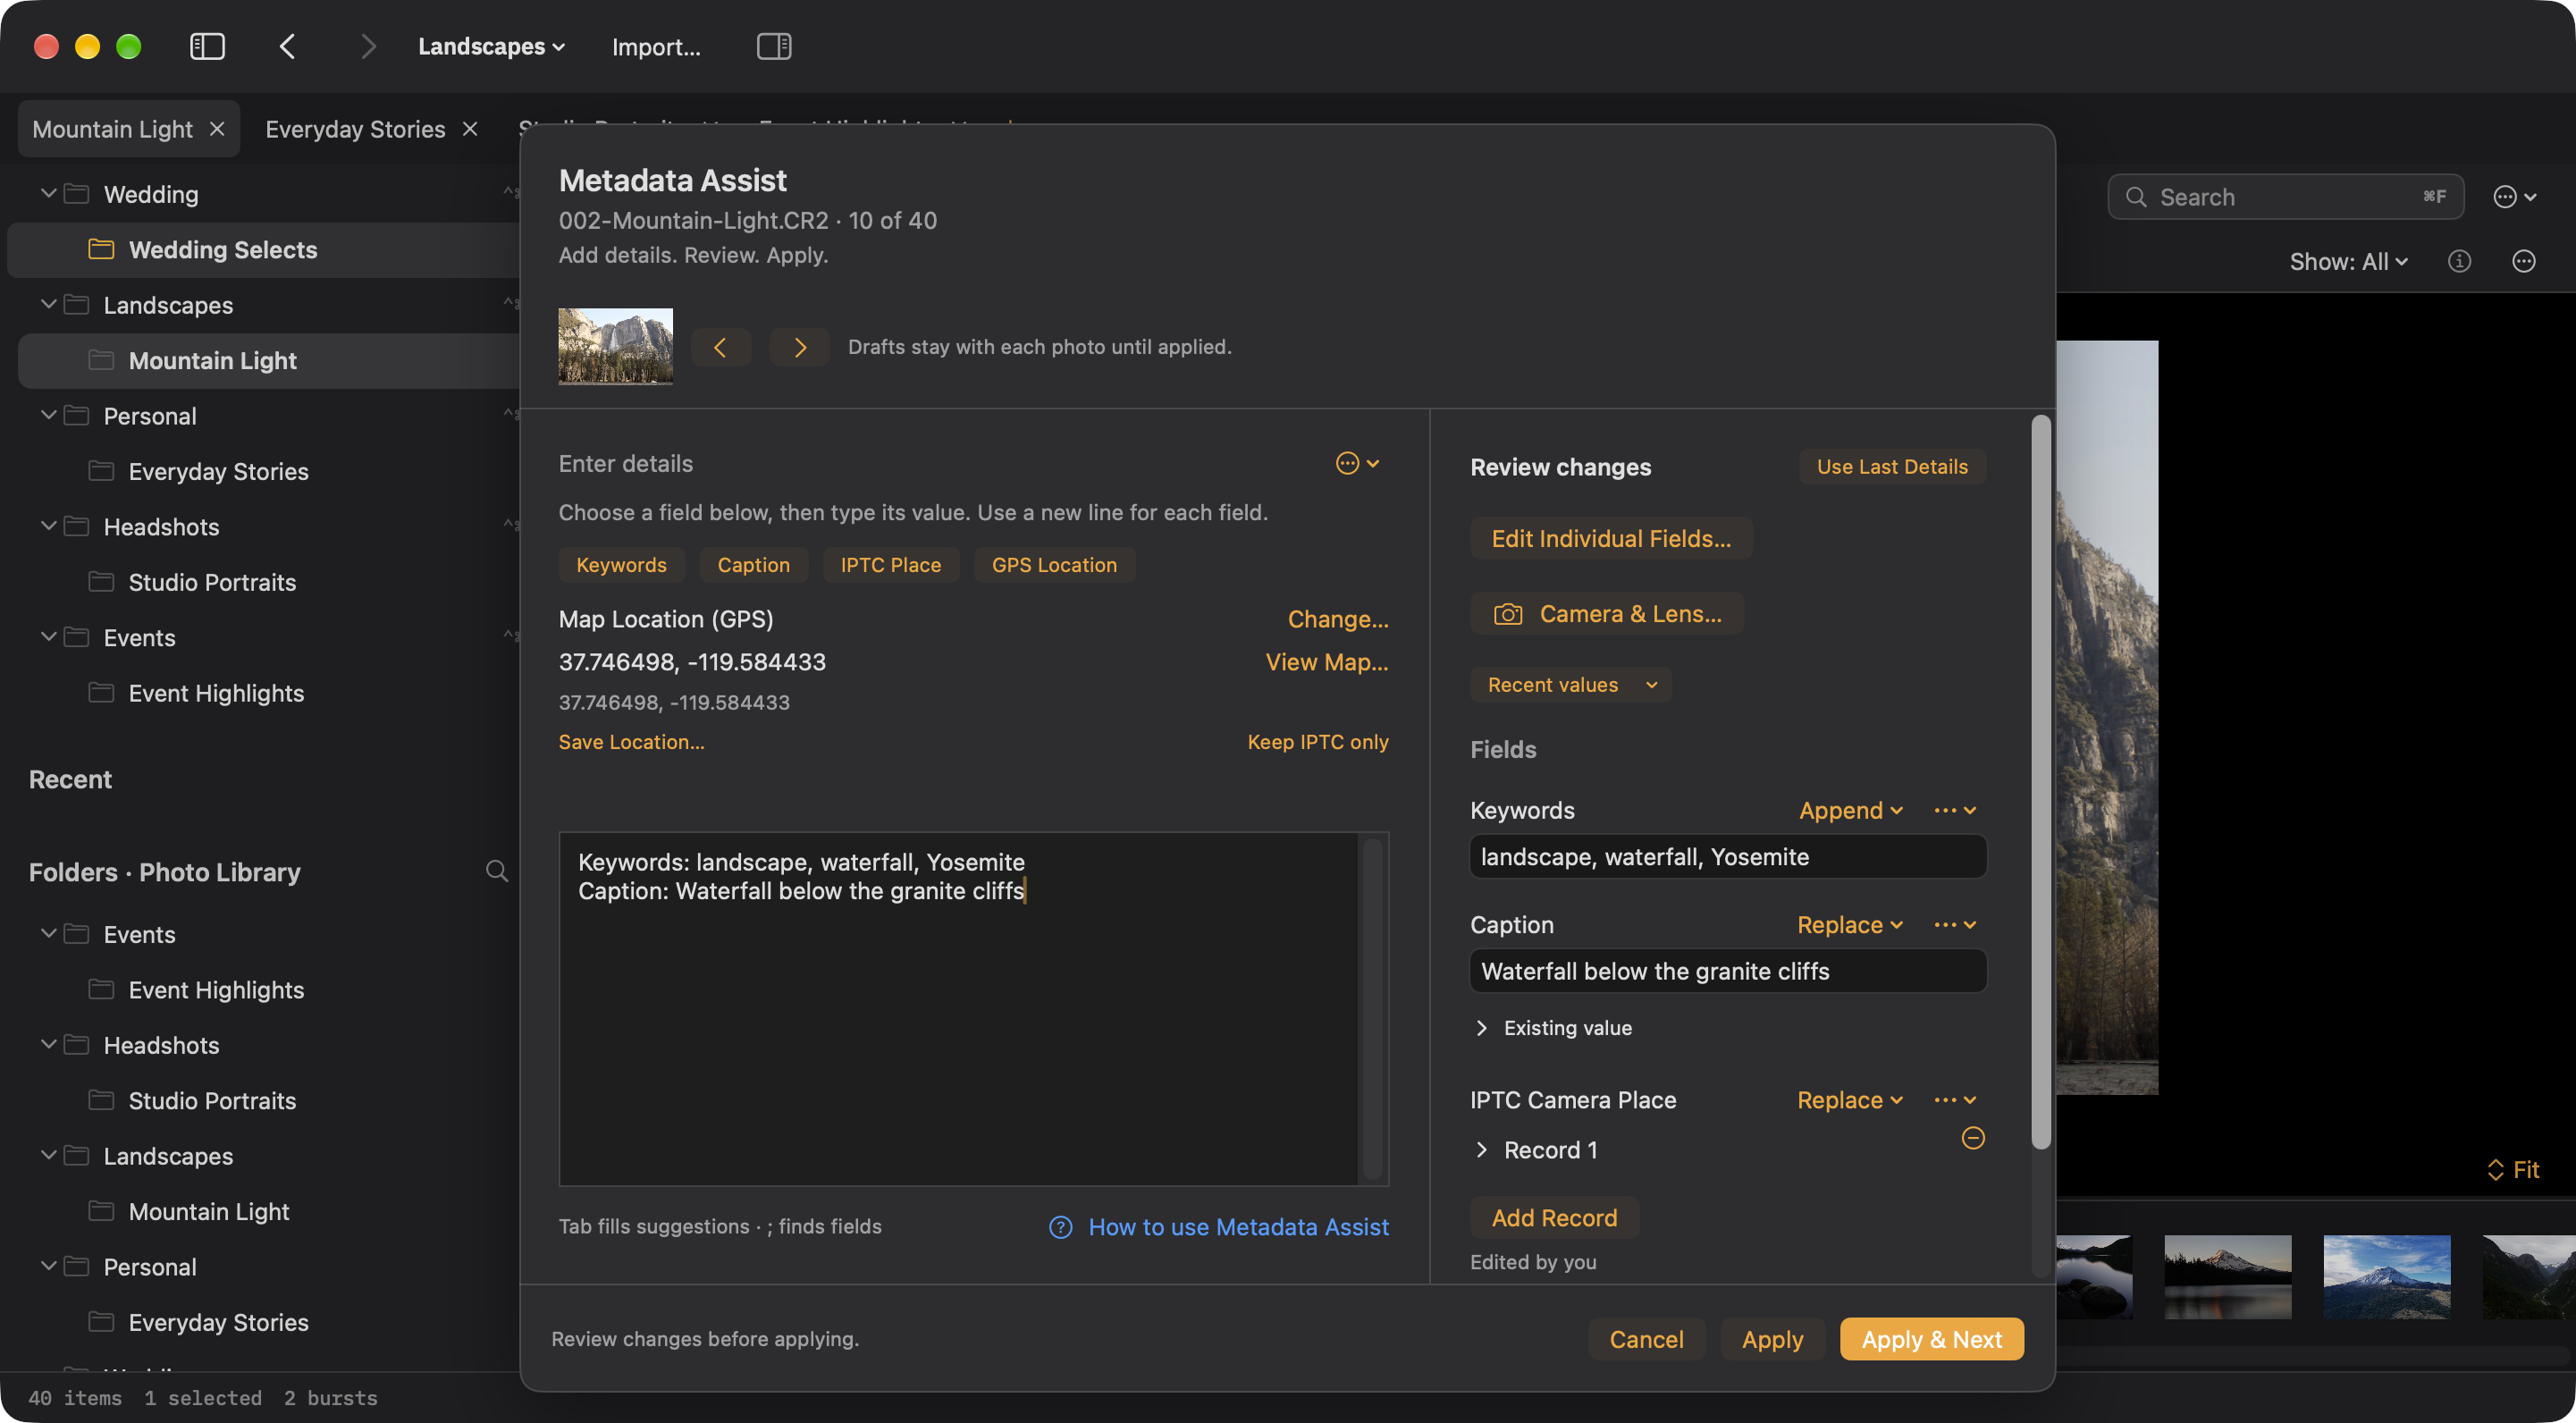
Use details again
Previously applied or staged values are remembered locally. Type a prefix and press Tab to fill the highlighted suggestion; arrow keys choose another result and Escape dismisses suggestions. Keywords complete individually after commas and also use Ingest’s existing keyword history. Caption and other field histories stay separate.
Recent values recalls an individual field or map location; each field’s options menu also lists recent values. Use Last Details replaces the current review draft with the last applied set. It does not apply anything. Canceled and failed drafts do not enter history; the last 20 distinct values per field and 20 map locations are kept locally.
Place names and map pins
A typed Location supplies IPTC place text and leaves GPS unchanged. Use GPS Location beside the writing area to search saved places or addresses, or paste coordinates or an Apple Maps coordinate link. Select a result to review its pin; typing focus returns to the writing area. Save Location… stores a named place for reuse across the location pickers, including Apple Photos. Saved places work offline. Right-click a saved result to remove it. Saving a location does not write to photos.
With one photo selected, Previous and Next browse the current order while keeping separate unsaved drafts. For a multiple selection, choose Edit Individually to work through that selection, or Edit Together to return to its batch draft. Apply saves and keeps Assist open; Apply & Next saves and advances only after success. Close discards unapplied drafts. When opened from Import Settings, Metadata Assist stages details for imported copies.
Prepare an import
Stage client, event, location, and shoot date for naming and folder templates. Use for Import updates the plan; copying is still a separate action. Metadata is written to verified destination copies. Shoot date does not rewrite capture timestamps. Projects retain shared details across cards; otherwise choose Keep details for the next card. Explicit per-photo edits take precedence.
Codes and copying
Workspace caption codes expand short codes into known text, using UTF-8 tab-separated files and normally the = delimiter. ⇧⌘C copies selected metadata groups; ⇧⌘V pastes those groups for the current selection. Copy choices are remembered per workspace.
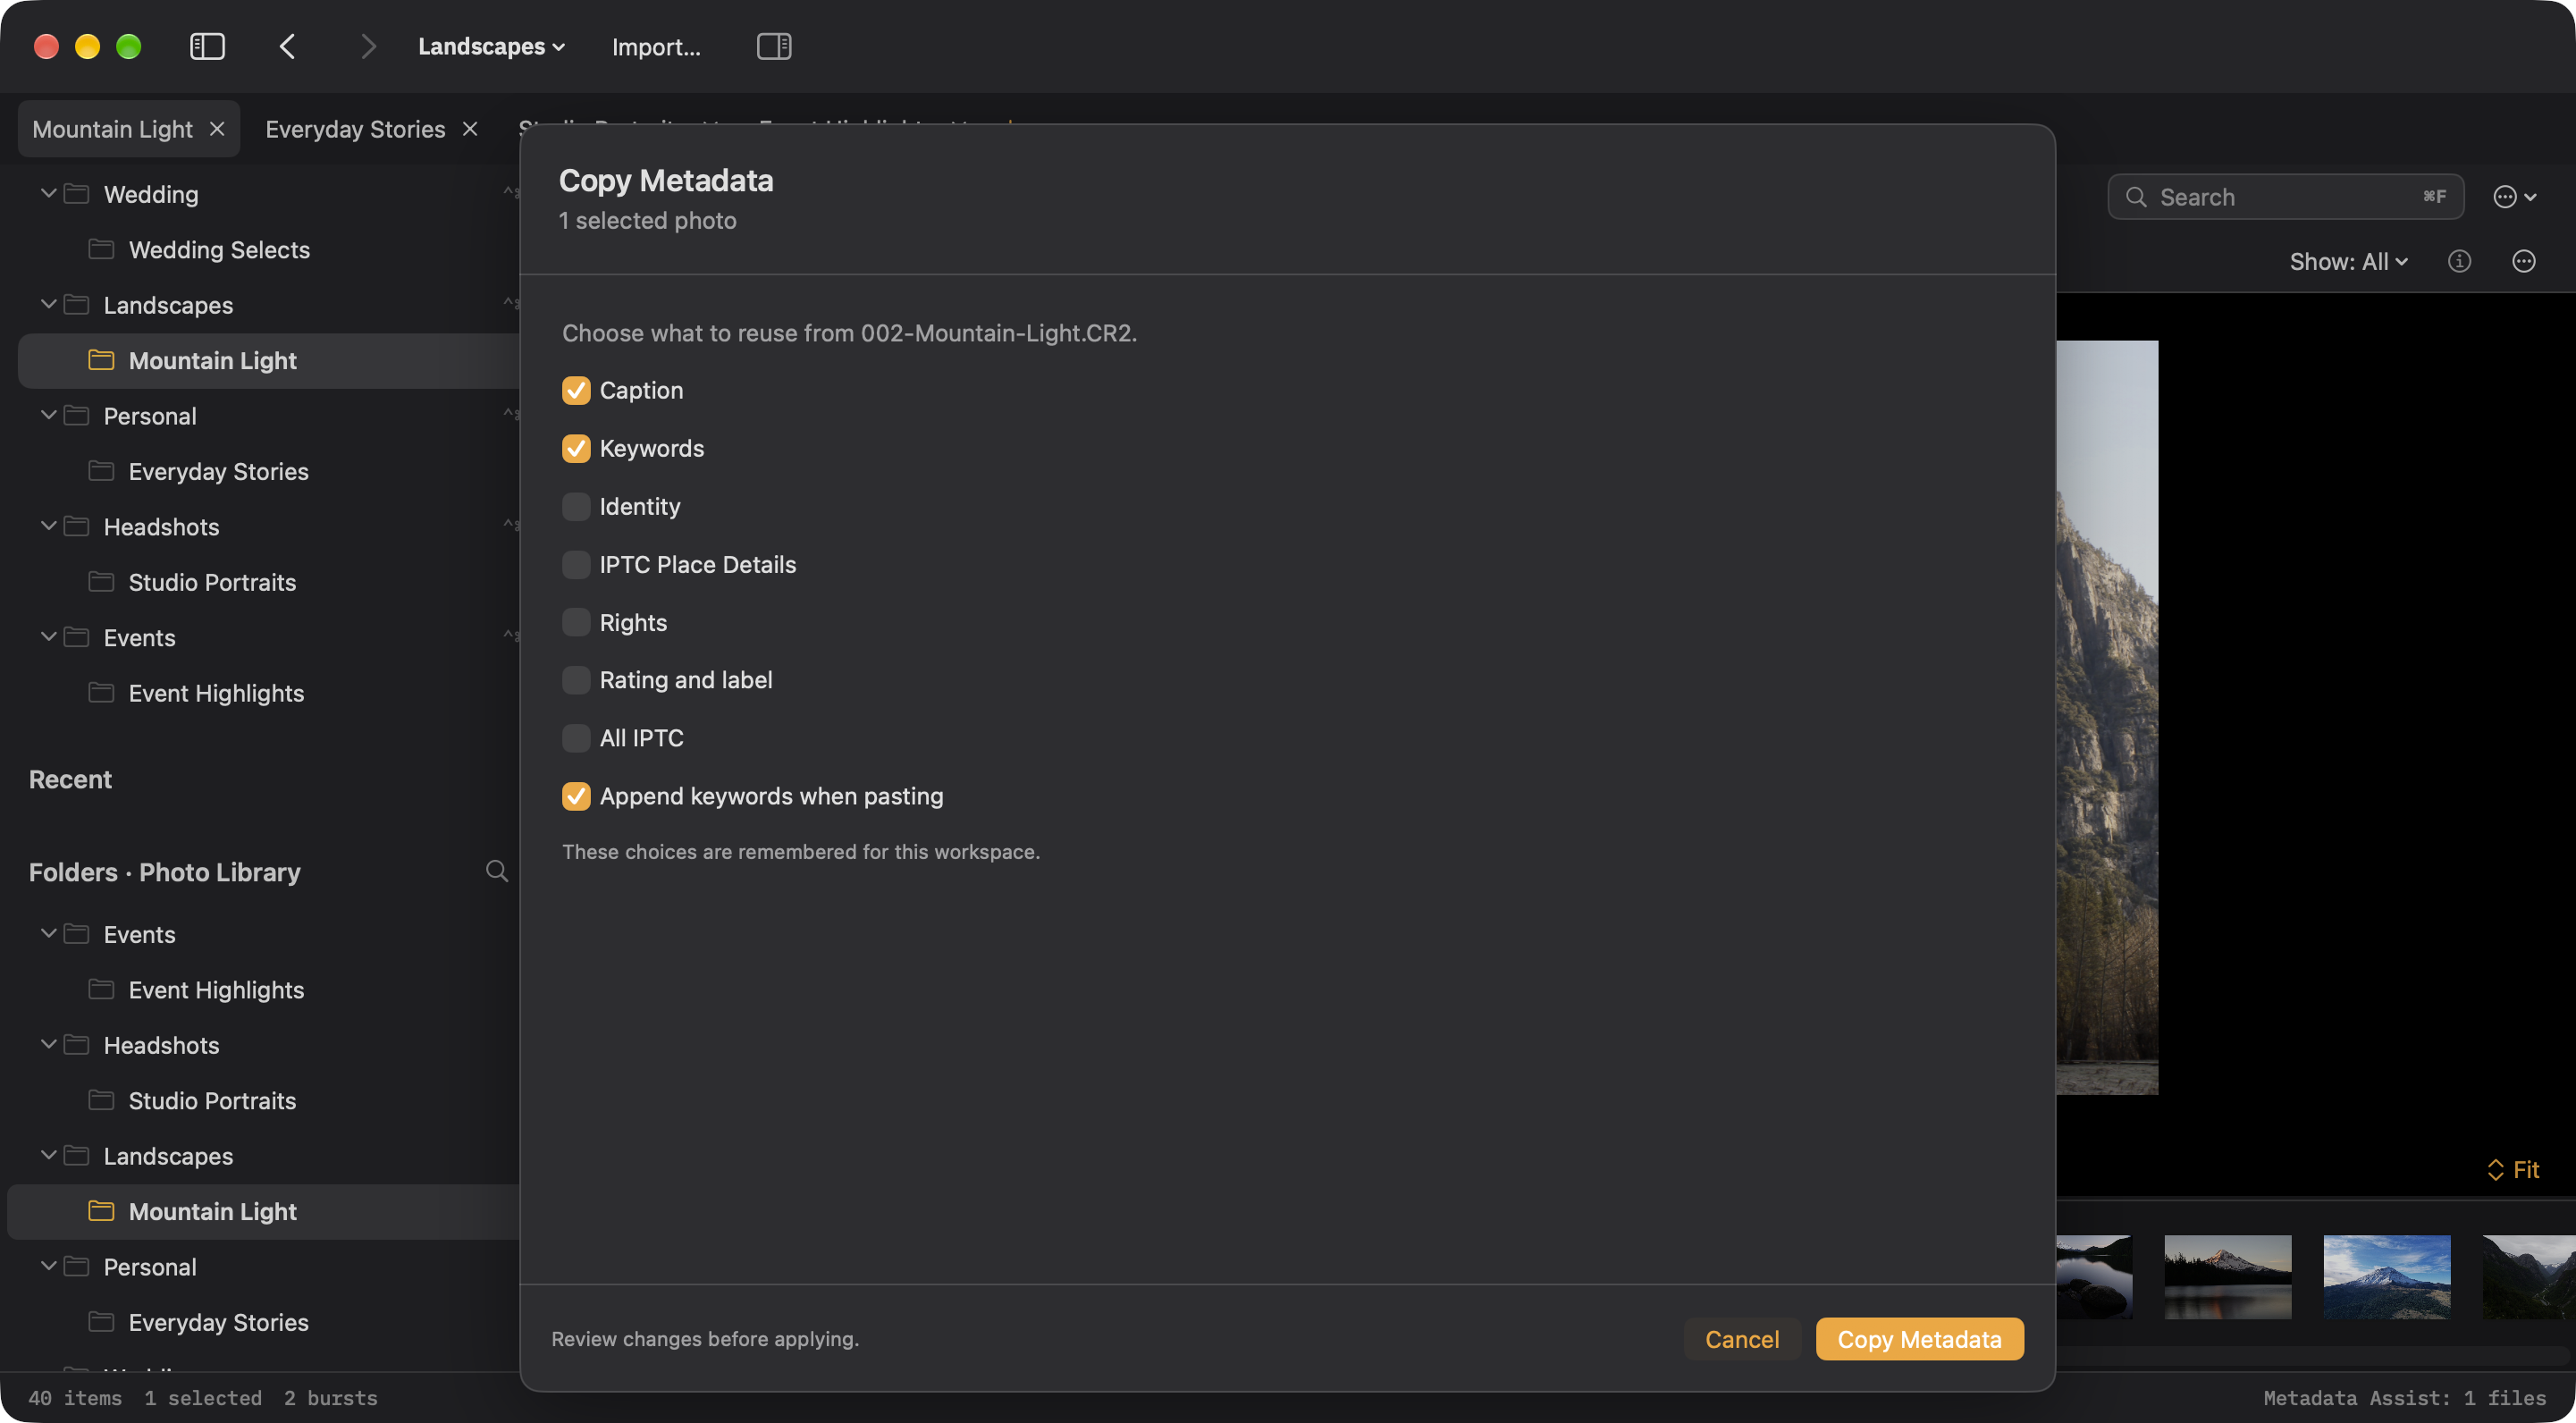
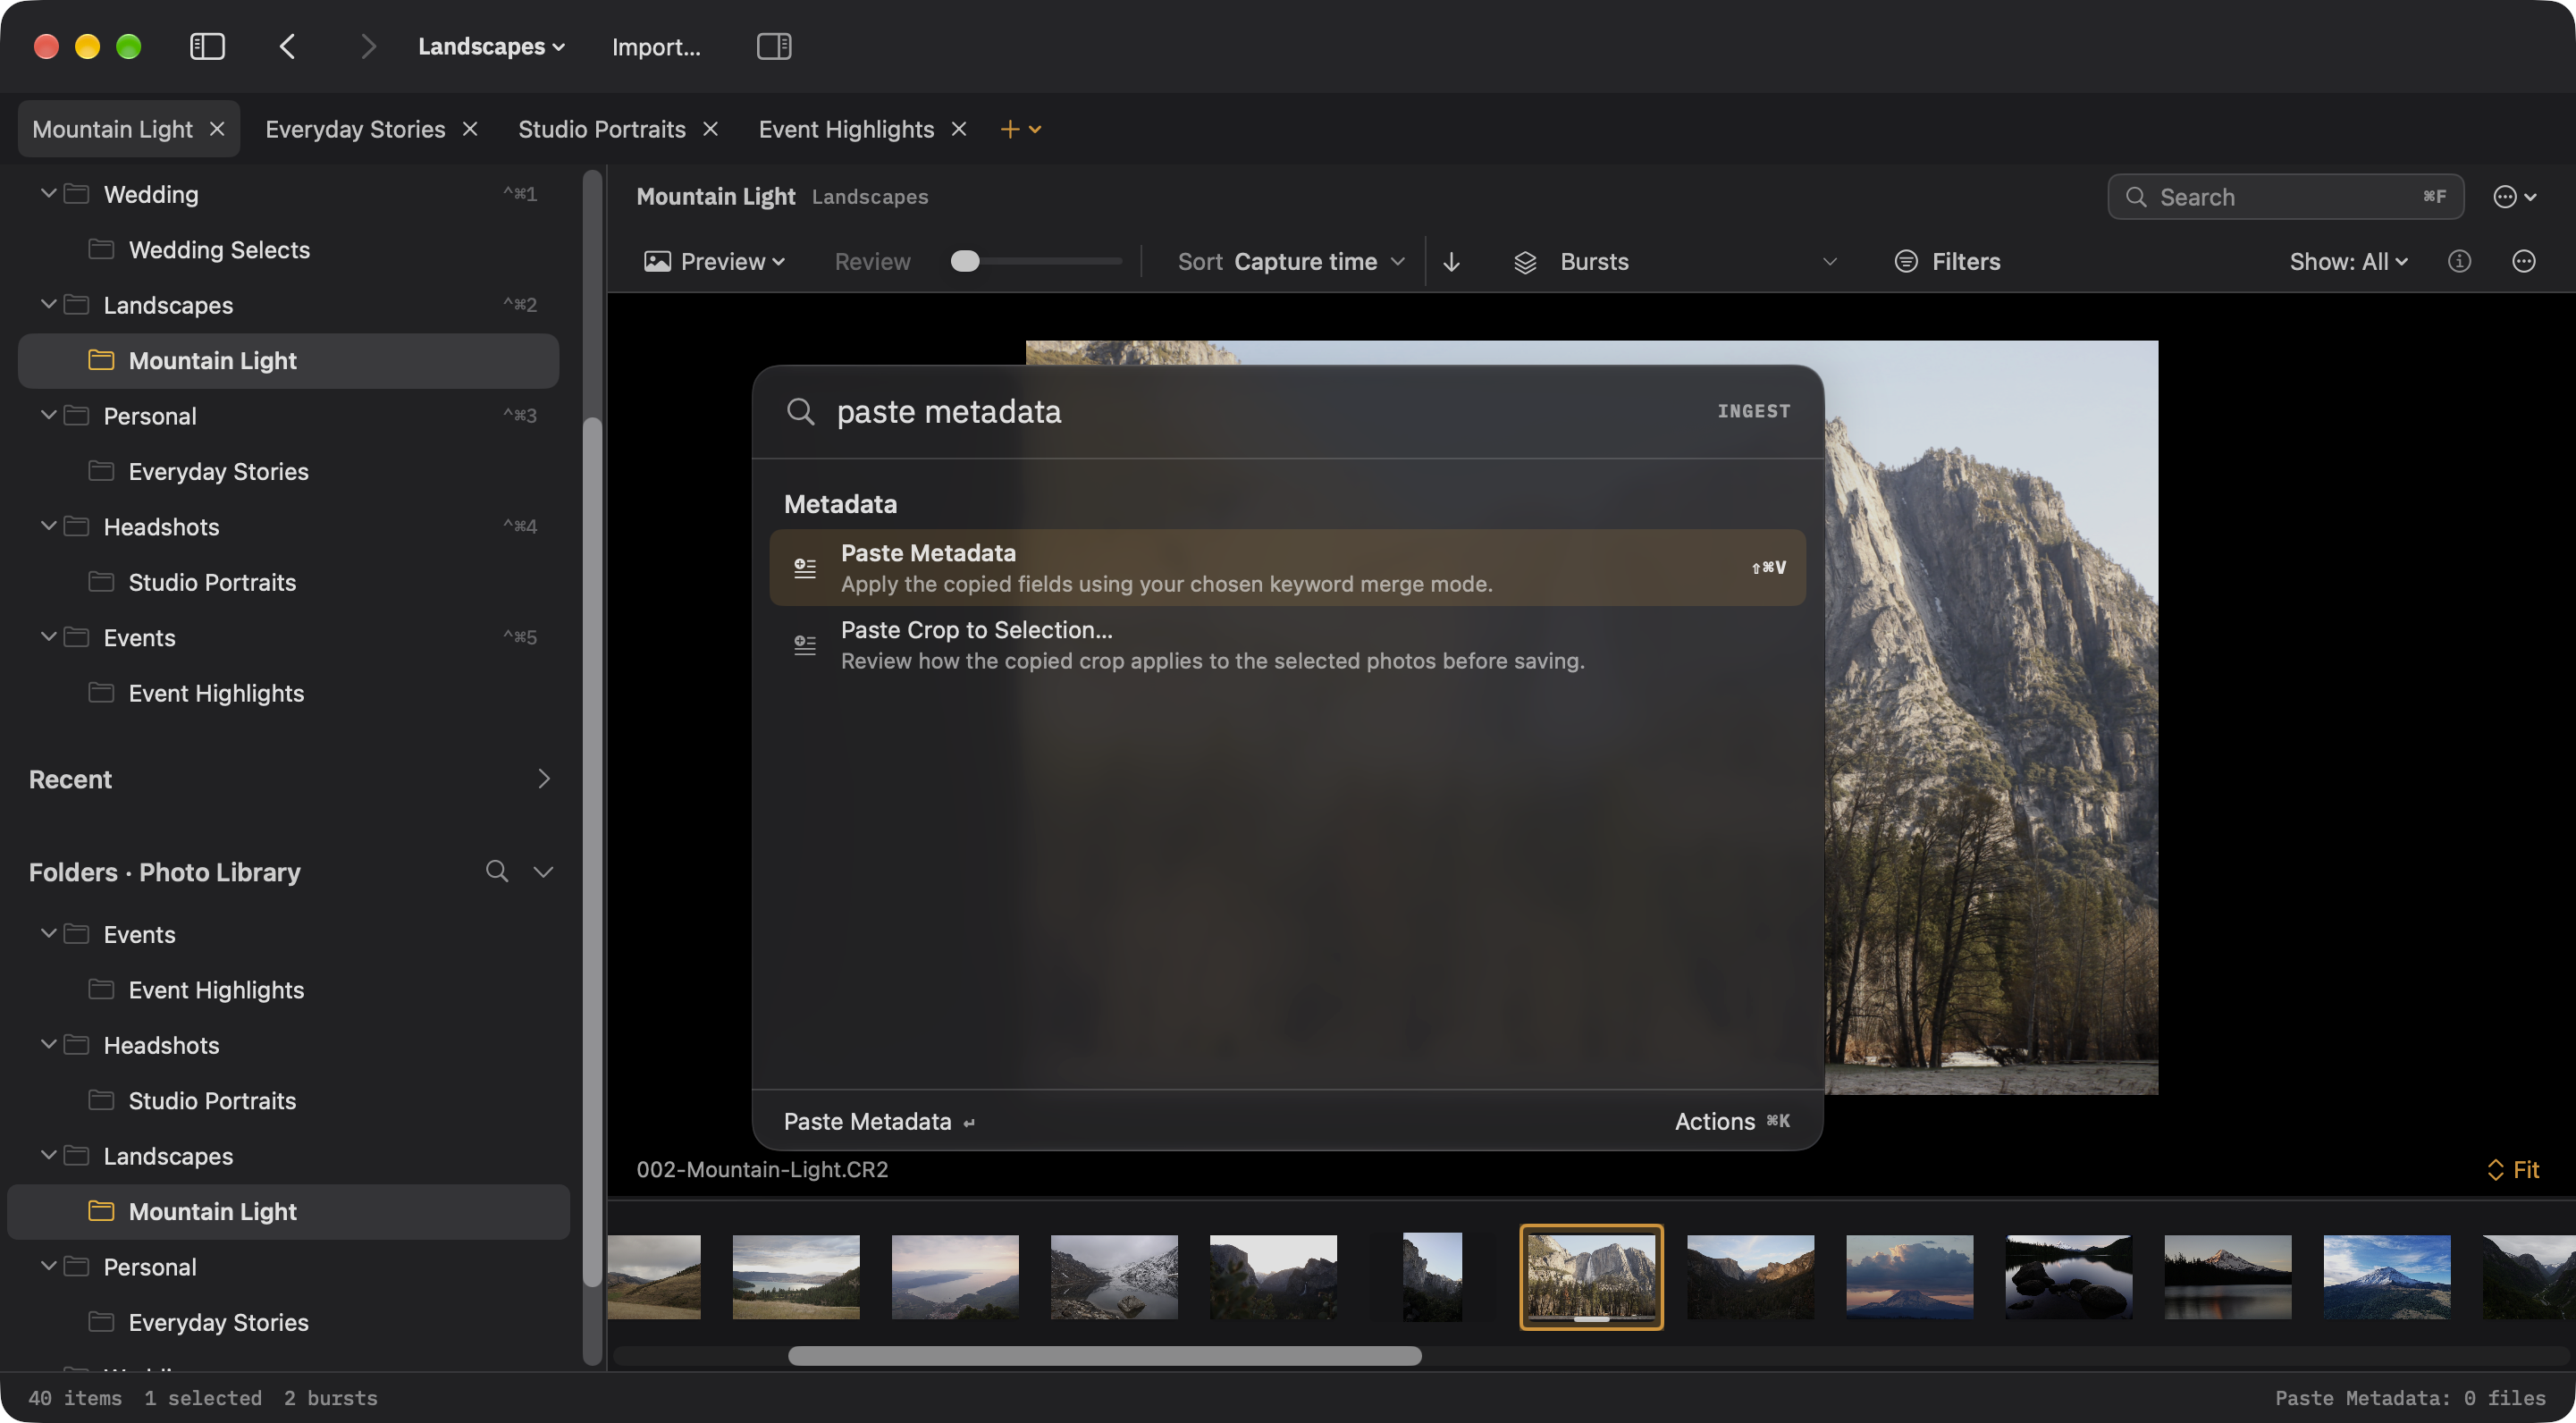
Add details. Review. Apply. Typing alone writes nothing. Metadata Assist does not invent captions or infer instructions from prose. Cancel discards the draft. Its built-in How to use Metadata Assist guide provides examples.
Q retains the earlier Quick Entry syntax inside the same reviewed editor. See the syntax reference.
Presets
A metadata preset is a named set of fields to apply together: keywords, a caption, a title, your creator and copyright, and optionally a location. M shows the list with what each one would change, and ⇧⌘M applies the last one again without asking.
Each field chooses whether it replaces what is there or leaves an existing value alone, so a preset can fill in the blanks on a hundred photographs without overwriting the captions you wrote by hand. Keywords can add to what is there rather than replace it.
Captions and titles can use the tokens, so a preset with the caption {address} writes the right address on every photograph of every job, for ever, without being edited.
A preset can also be chosen in Import Settings or the workspace’s Ingest defaults, which applies it to the copies as they arrive. That is usually the right moment, because the card stays untouched and the work happens once.
Locations
⌘L searches for an address and sets it as the job location. Choose the result and the coordinates are attached, then Apply to the selection, to everything tagged, or to everything.
Ingest writes the GPS coordinates in the EXIF fields Apple Photos reads, so a pin appears on the map, and the city, state, and country in the fields Lightroom reads, so a search for a city finds the photographs. Both at once, from one address.
⇧⌘L strips every location field back out, which is the one to know before sending photographs of your house to a stranger. Address search sends queries to Apple while you type. Software update checks also use the network. The privacy page has the detail.
Destinations
Favorites give you quick access to folders you use often. Add to Favorites is available in the menu and command palette; ⌃⌘1 through ⌃⌘9 open the first nine favorites. Find them by name in ⌘K as well. Ingest destinations and routing are saved with the workspace.
An ingest can write to two destinations at once. The second copy is made from the first one after it has been verified, and it is checked the same way.
The active workspace supplies import defaults. Open Import… to review or adjust a single job. Edit Settings → Workspaces → Ingest to reuse destinations, naming, routing, and other import choices.
Renaming
Curly braces rename. Names are built from templates: text plus tokens in braces. {yyyy}{mm}{dd}-{seqn} gives 20260912-7078. Semicolon finds metadata fields instead — a different habit. The full list of tokens, and how saved sequence numbers work, is on the naming page.
Renaming happens during an ingest, or in place afterwards with ⌘R. ⌥⌘R re-sequences what is on screen, which is how you close the gaps in the numbering after throwing half a shoot away.
Every rename records the original filename inside the file, so Undo Rename can put the old names back later, even in a folder you opened fresh.
Ingesting
⌘G or Import… opens Import Settings from Browse, with settings on the left and photo scope and output preview on the right. Choose a card, folder, or archive; the active workspace supplies the saved destination, names, metadata, and routing. Review the destination preview before starting.
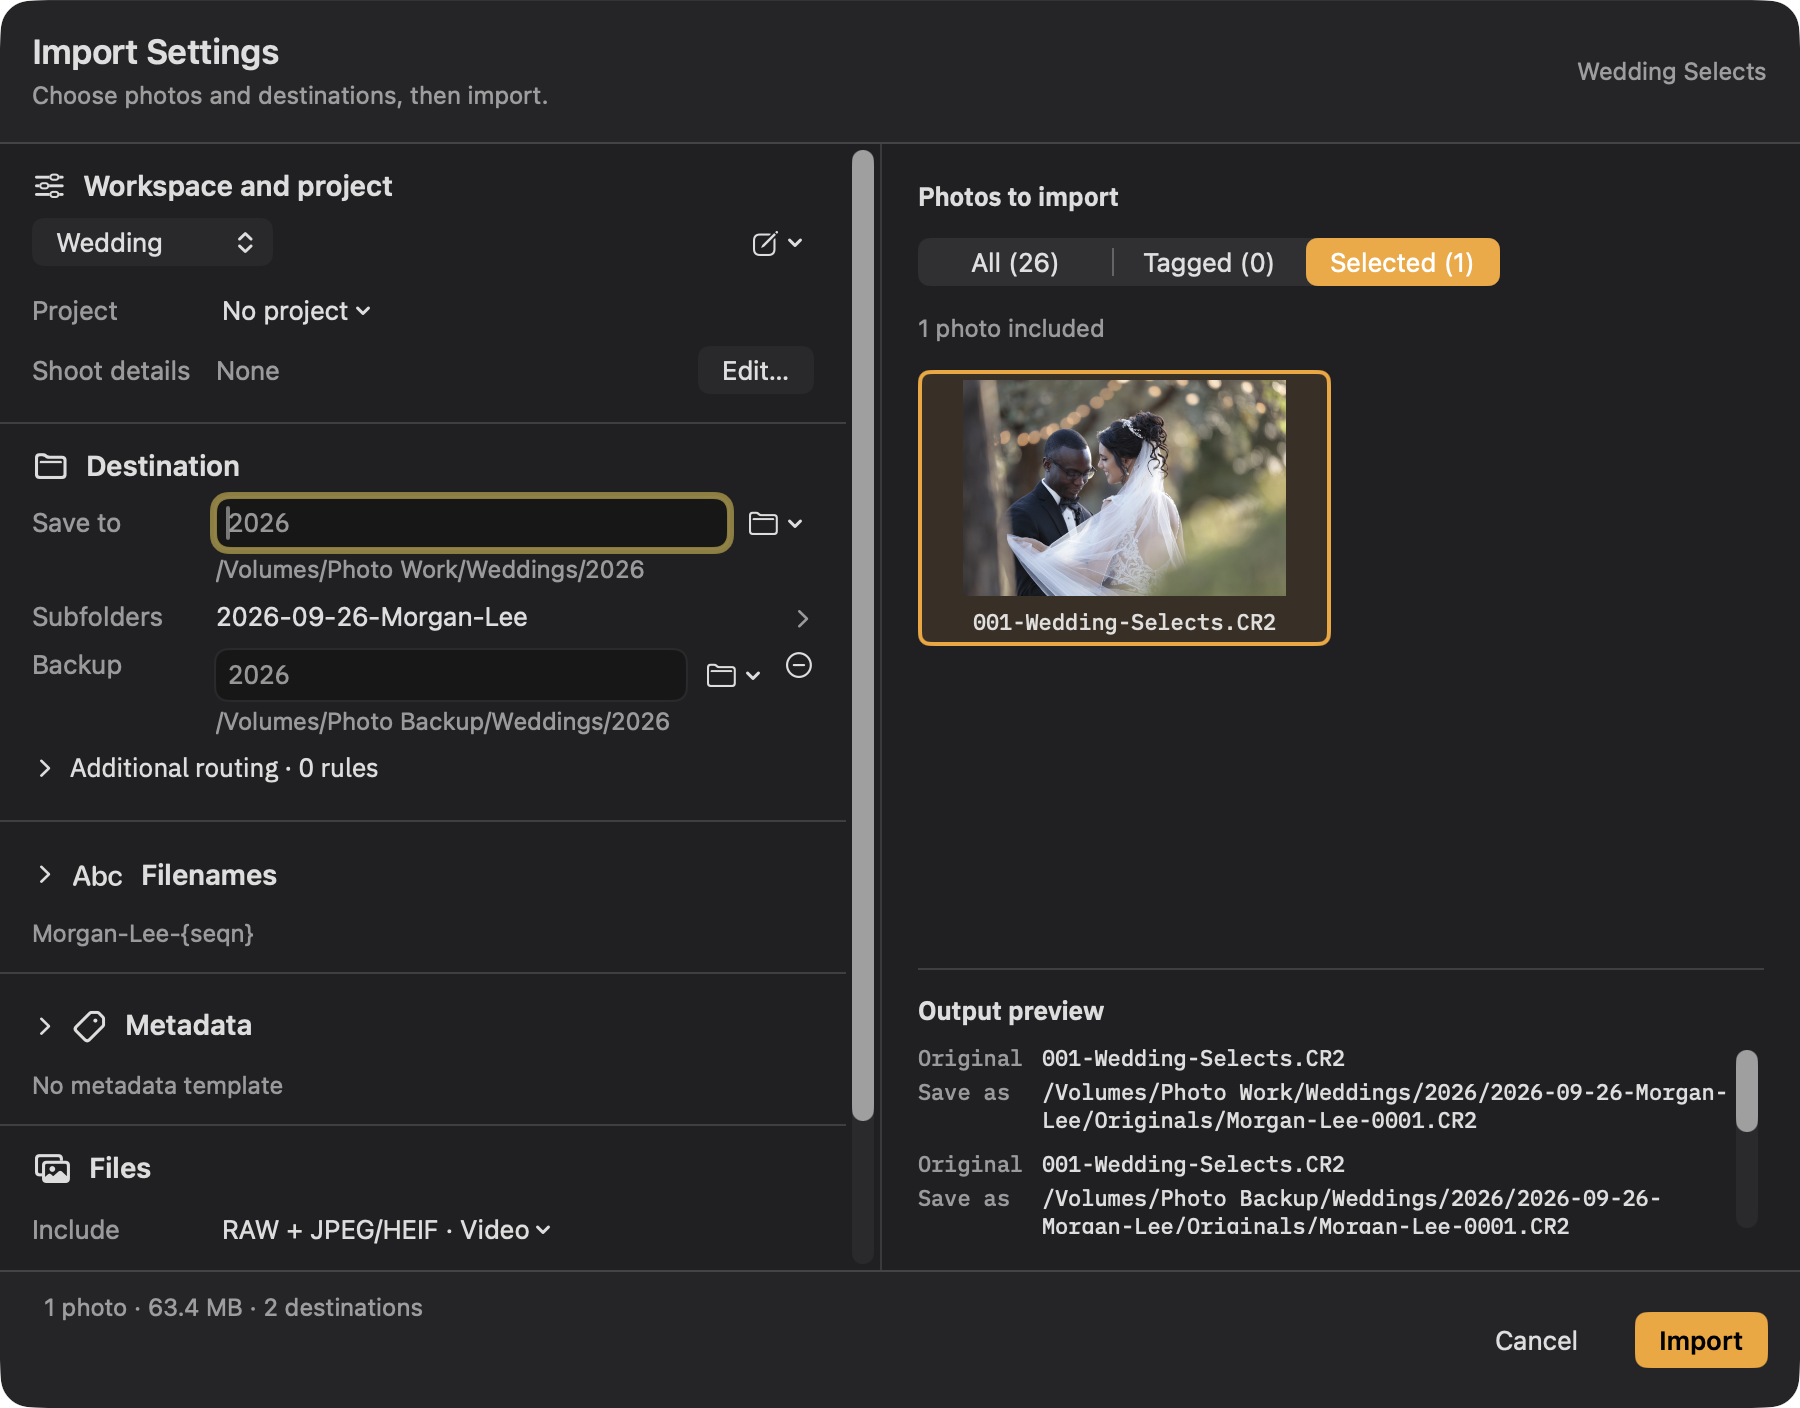
Photos to import offers All, Tagged, and Selected. Opening Import Settings starts at Selected when photos are selected, otherwise All. Select Tagged explicitly to import keepers. Display filters do not choose the scope, and an empty scope does not fall back to All. New sources start with No project; use a project only when you need shared job details across cards. Review the scope count and output paths every time.
Settings on the left cover the workspace and project, Shoot details, Destination, Subfolders, Filenames, Metadata, Files, and After import. The right side shows the photo scope and final output paths. Workspace actions can save changes for reuse; a one-time import adjustment does not require a new workspace.
Click Import after reviewing the plan. Then:
- Each file is copied to a temporary name and flushed to disk.
- The copy is read back and compared to the source. If they differ, that file is not published and the ingest says so.
- The verified copy is given its real name, in a way that cannot overwrite an existing file even if one appeared a moment ago.
- A second destination is copied from the first and checked the same way.
- Metadata and marks are written to the copies.
- A record of the job is saved, so Ingest can tell you later which photographs from this card you have already taken.
- After verified copying, explicit card-cleanup choices run. For RAW-only imports, Delete copied files also removes intentionally excluded JPEG/HEIF twins after their RAW verifies at every destination. Leave the card alone preserves both.
The progress strip shows copied files and verified, published files separately. Each destination gets a completion check only when it holds every planned file. If an ingest stops early, the receipt identifies what remains only on the card and offers a deliberate retry.
Canceling keeps what was already copied and verified, and the sequence number only advances by the files actually named. A card that was half emptied last time is not a problem either: the photographs you already took are marked, and the New Since Last Import split shows you the rest.
Actions
An action is a list of steps that runs when the copy is finished: open the files in Lightroom, import them into an Apple Photos album, copy them somewhere else, run a Shortcut, run a script. Choose the post-ingest action in your workflow settings.
They are built in Settings → Automation, with a button that runs one on the current selection so you can test it without waiting for a card. The detail, including what a script gets handed, is on the automation page.
Browse is the main workspace. File → Organize… and Social Export… open independent, resizable editor windows, also available through the photo context menu and command palette. Workspace remains for presets. Closing an idle editor saves its draft without applying file changes or exporting; Organize still requires Review Changes… and Social Export still requires Export….
Workspaces
The window toolbar and Workspace menu share the workspace chooser. Set Open at Launch separately from your active workspace. Control-0 selects Basic; Control-1 through Control-9 select assigned workspaces. Focus Mode (F) hides surrounding controls without changing saved panel preferences; ⇧F fits the photo.
A workspace saves the setup for a kind of photography: starting view, sort, grouping, thumbnail size, favorite folders, and sidebar preferences, plus import destinations, filenames, folder structures, metadata, actions, and RAW/JPEG and video routing. It can also supply Organize defaults and a Social Export preset. Configure General, Ingest, Organize, Browse, and Social Export in Settings → Workspaces. These are settings sections; Browse stays central and the editors open in independent windows.
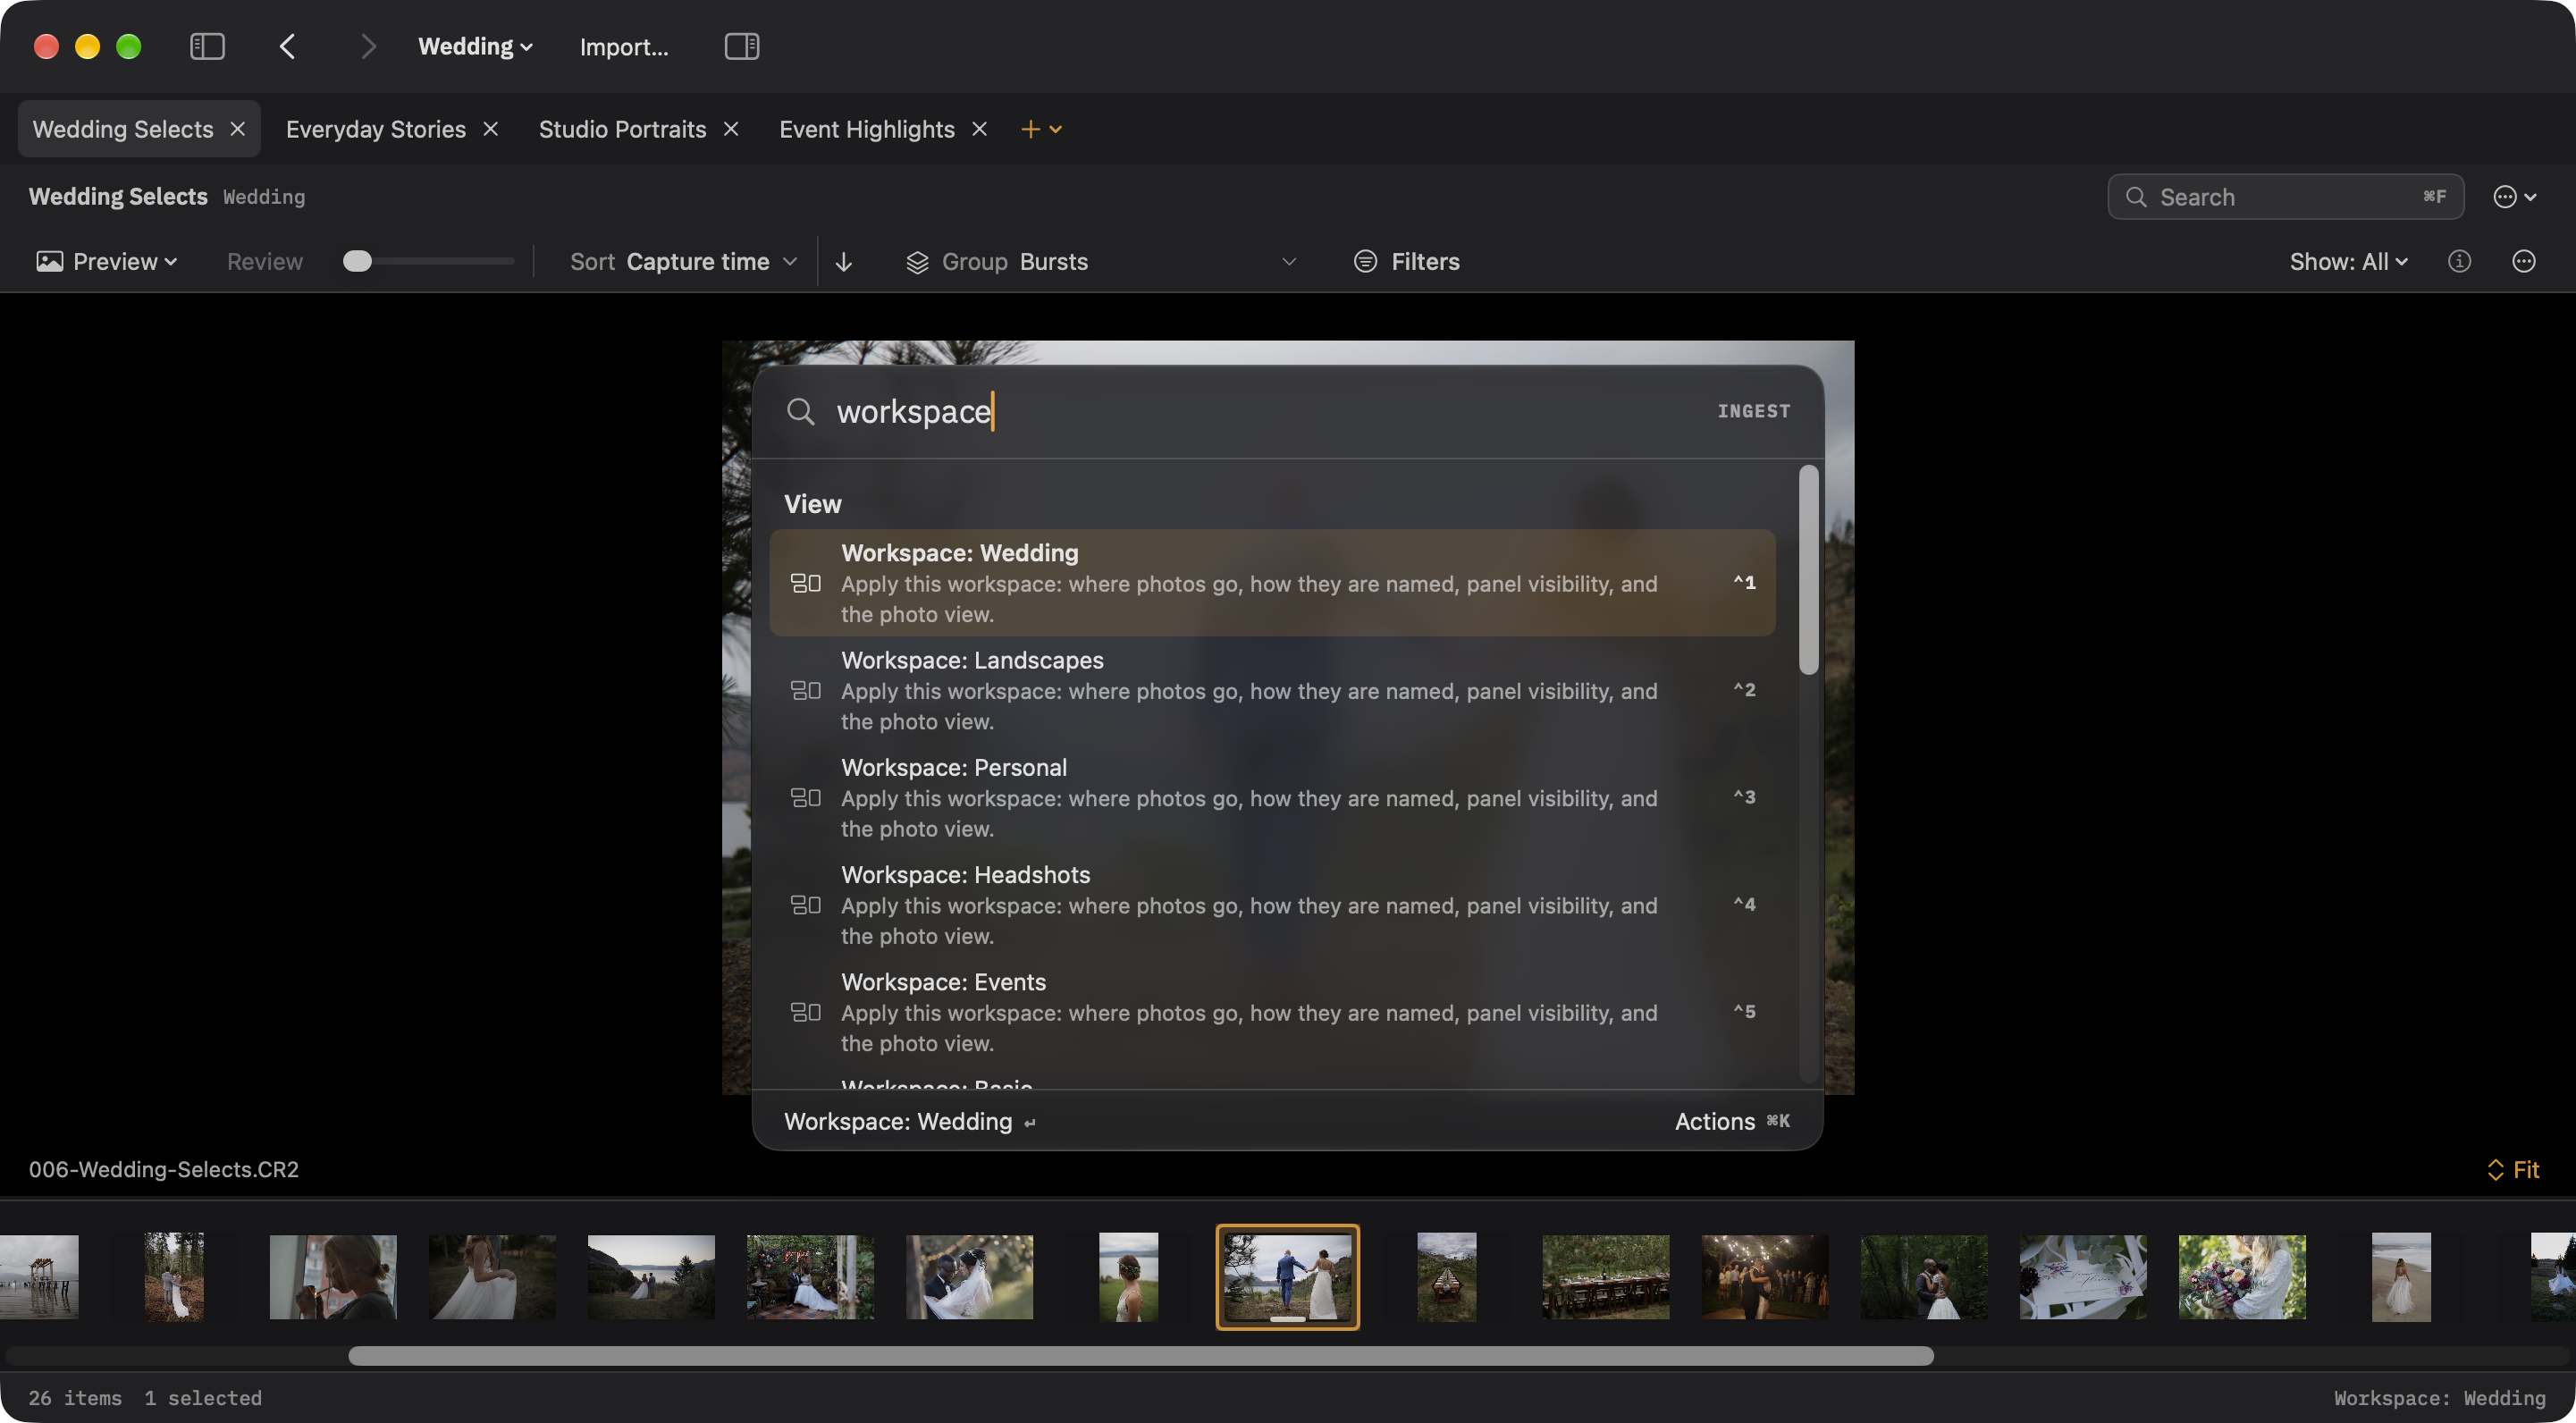
⌃0 selects Basic; ⌃1 through ⌃9 select assigned workspaces. Camera matching can choose a workspace when a card opens; a workspace chosen by hand takes precedence. Apple Photos has both a global switch in Settings → General and a switch in each workspace’s General section. Both must be enabled for Photos controls to appear.
The Command Palette
If you can do it in Ingest, you can find it with ⌘K. Search for an action by name: review photos, edit metadata, change a view, organize files, or export. Use the arrow keys to select a result and Return to run it. Commands that cannot run in the current context explain why.
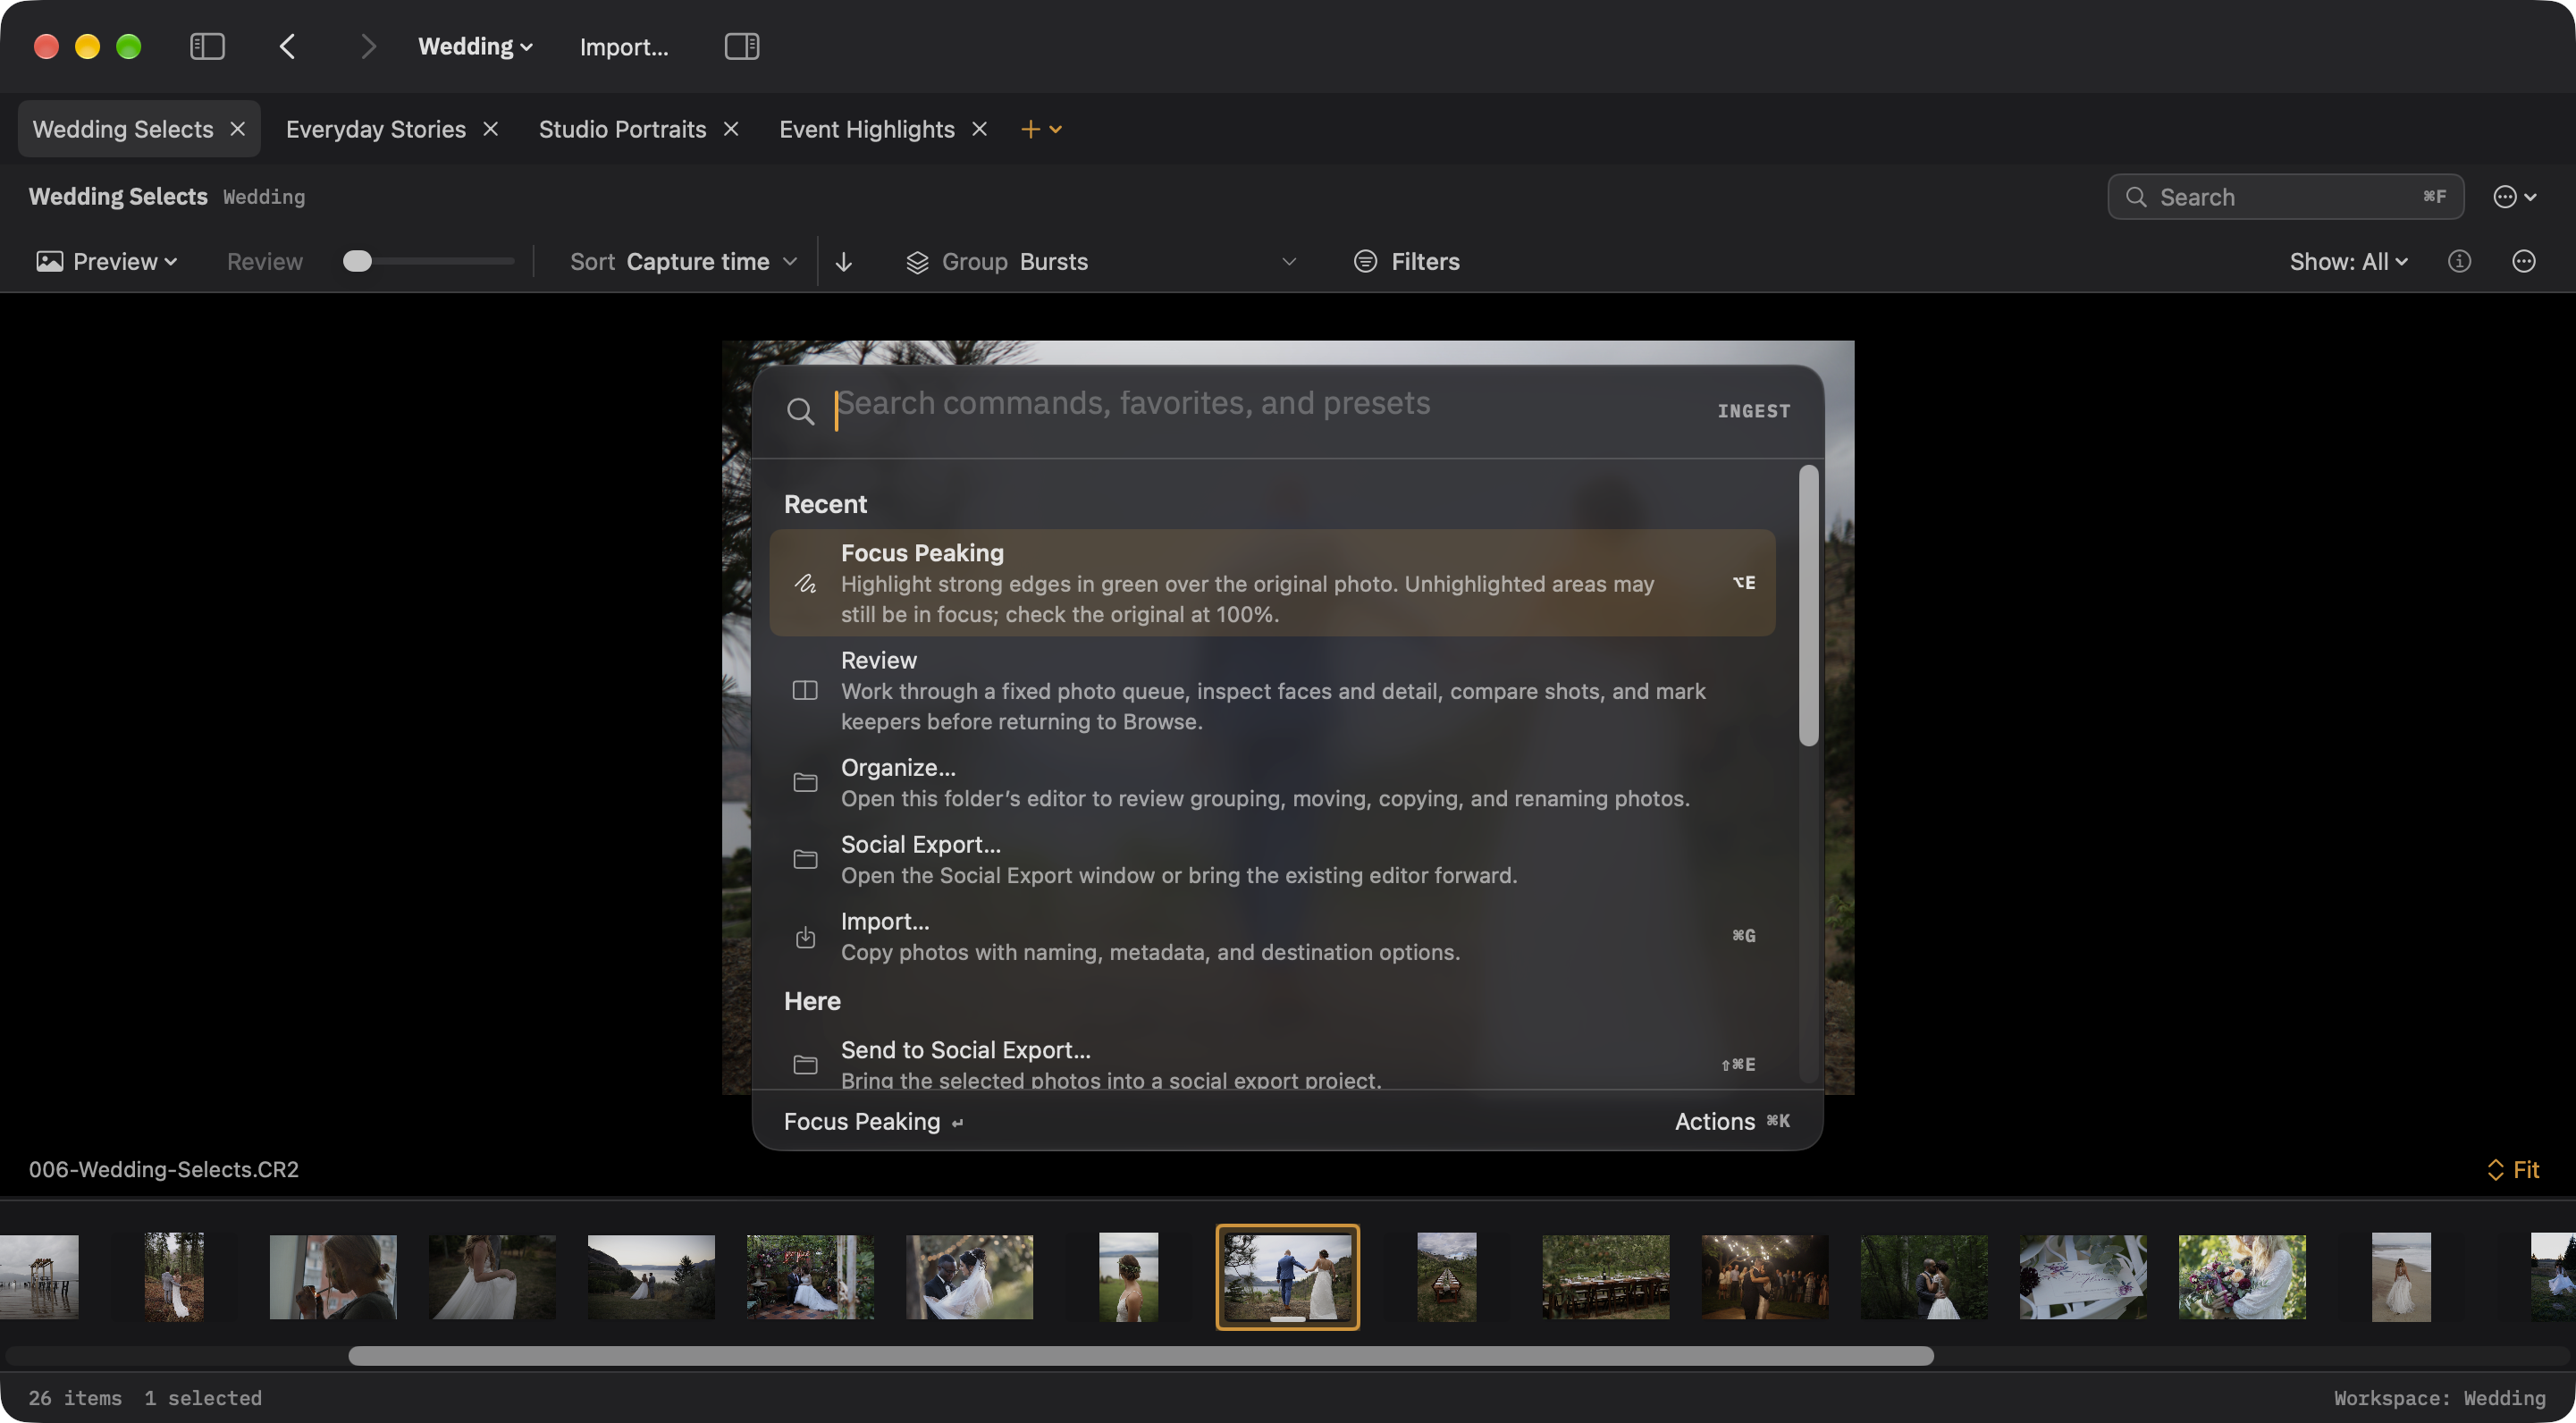
Commands with assigned shortcuts show them beside their names, so the Command Palette helps you learn the keys you use most. Commands that cannot run right now stay visible with the reason underneath, rather than vanishing and leaving you wondering. ⇧⌘P pins a command to the top for good.
Command descriptions explain what each action does. Settings → Command Palette controls descriptions, shortcut labels, and excluded commands. If you have hidden an action, you can restore it there.
The footer names the command Return will run. Click Actions or press ⌘K again to pin or unpin the highlighted command, copy its link, or configure its shortcut. Configure Shortcut opens that exact command in Settings. Copy Link keeps the palette open and confirms the copy. Esc closes Actions first, then the palette and returns focus to where you were.
Choose Find Folder… in the palette, or press ⇧⌘F, to search folders on your Mac and connected drives. ⌘F filters photos in the current collection. Show Left Sidebar, Show Right Sidebar, and Show Both Sidebars change the view for the current workspace.
Your favorites, workspaces, splits, presets, actions, and recent folders are all in there too, so the palette is a way to go somewhere as well as a way to do something. ? shows the shortcut sheet, and tapping and releasing ⌘, then pressing it again and holding, shows contextual shortcuts. A single Command hold does not open the overlay.
Organize
The inspector follows Grouping, Destination, Filenames, and Destination Preview. Source-folder subfolders are the default. Enable full paths when useful, review example filenames, then use Review Changes… to confirm Copy, Move, or Rename before execution.
Choose File → Organize… in Browse, or find Organize in the photo context menu or Command Palette. It opens a separate, resizable window. Browse keeps its selection, filter, and scroll position behind it.
Organize resumes the folder’s saved draft when available. Set its photo scope to All, Selected, or Filtered and choose whether to include subfolders. Use the inspector’s Action to choose copying, moving, or renaming, then add grouping levels or a recipe. Opening the editor does not change files.
Add or change grouping levels, make your own groups, and move photos between them. Grouping choices do not change the original files. Review the proposed filenames and destinations before applying Copy, Move, or Rename. Existing files are preserved; conflicts must be resolved before applying changes. Memory cards must be ingested first.
Once you edit your choices or accept a new setup, Ingest saves that work for the folder. Returning shows Resumed saved setup and its last-edited date. Start Over opens the setup chooser again; applying a new setup can be undone and keeps the history needed to recover earlier file operations.
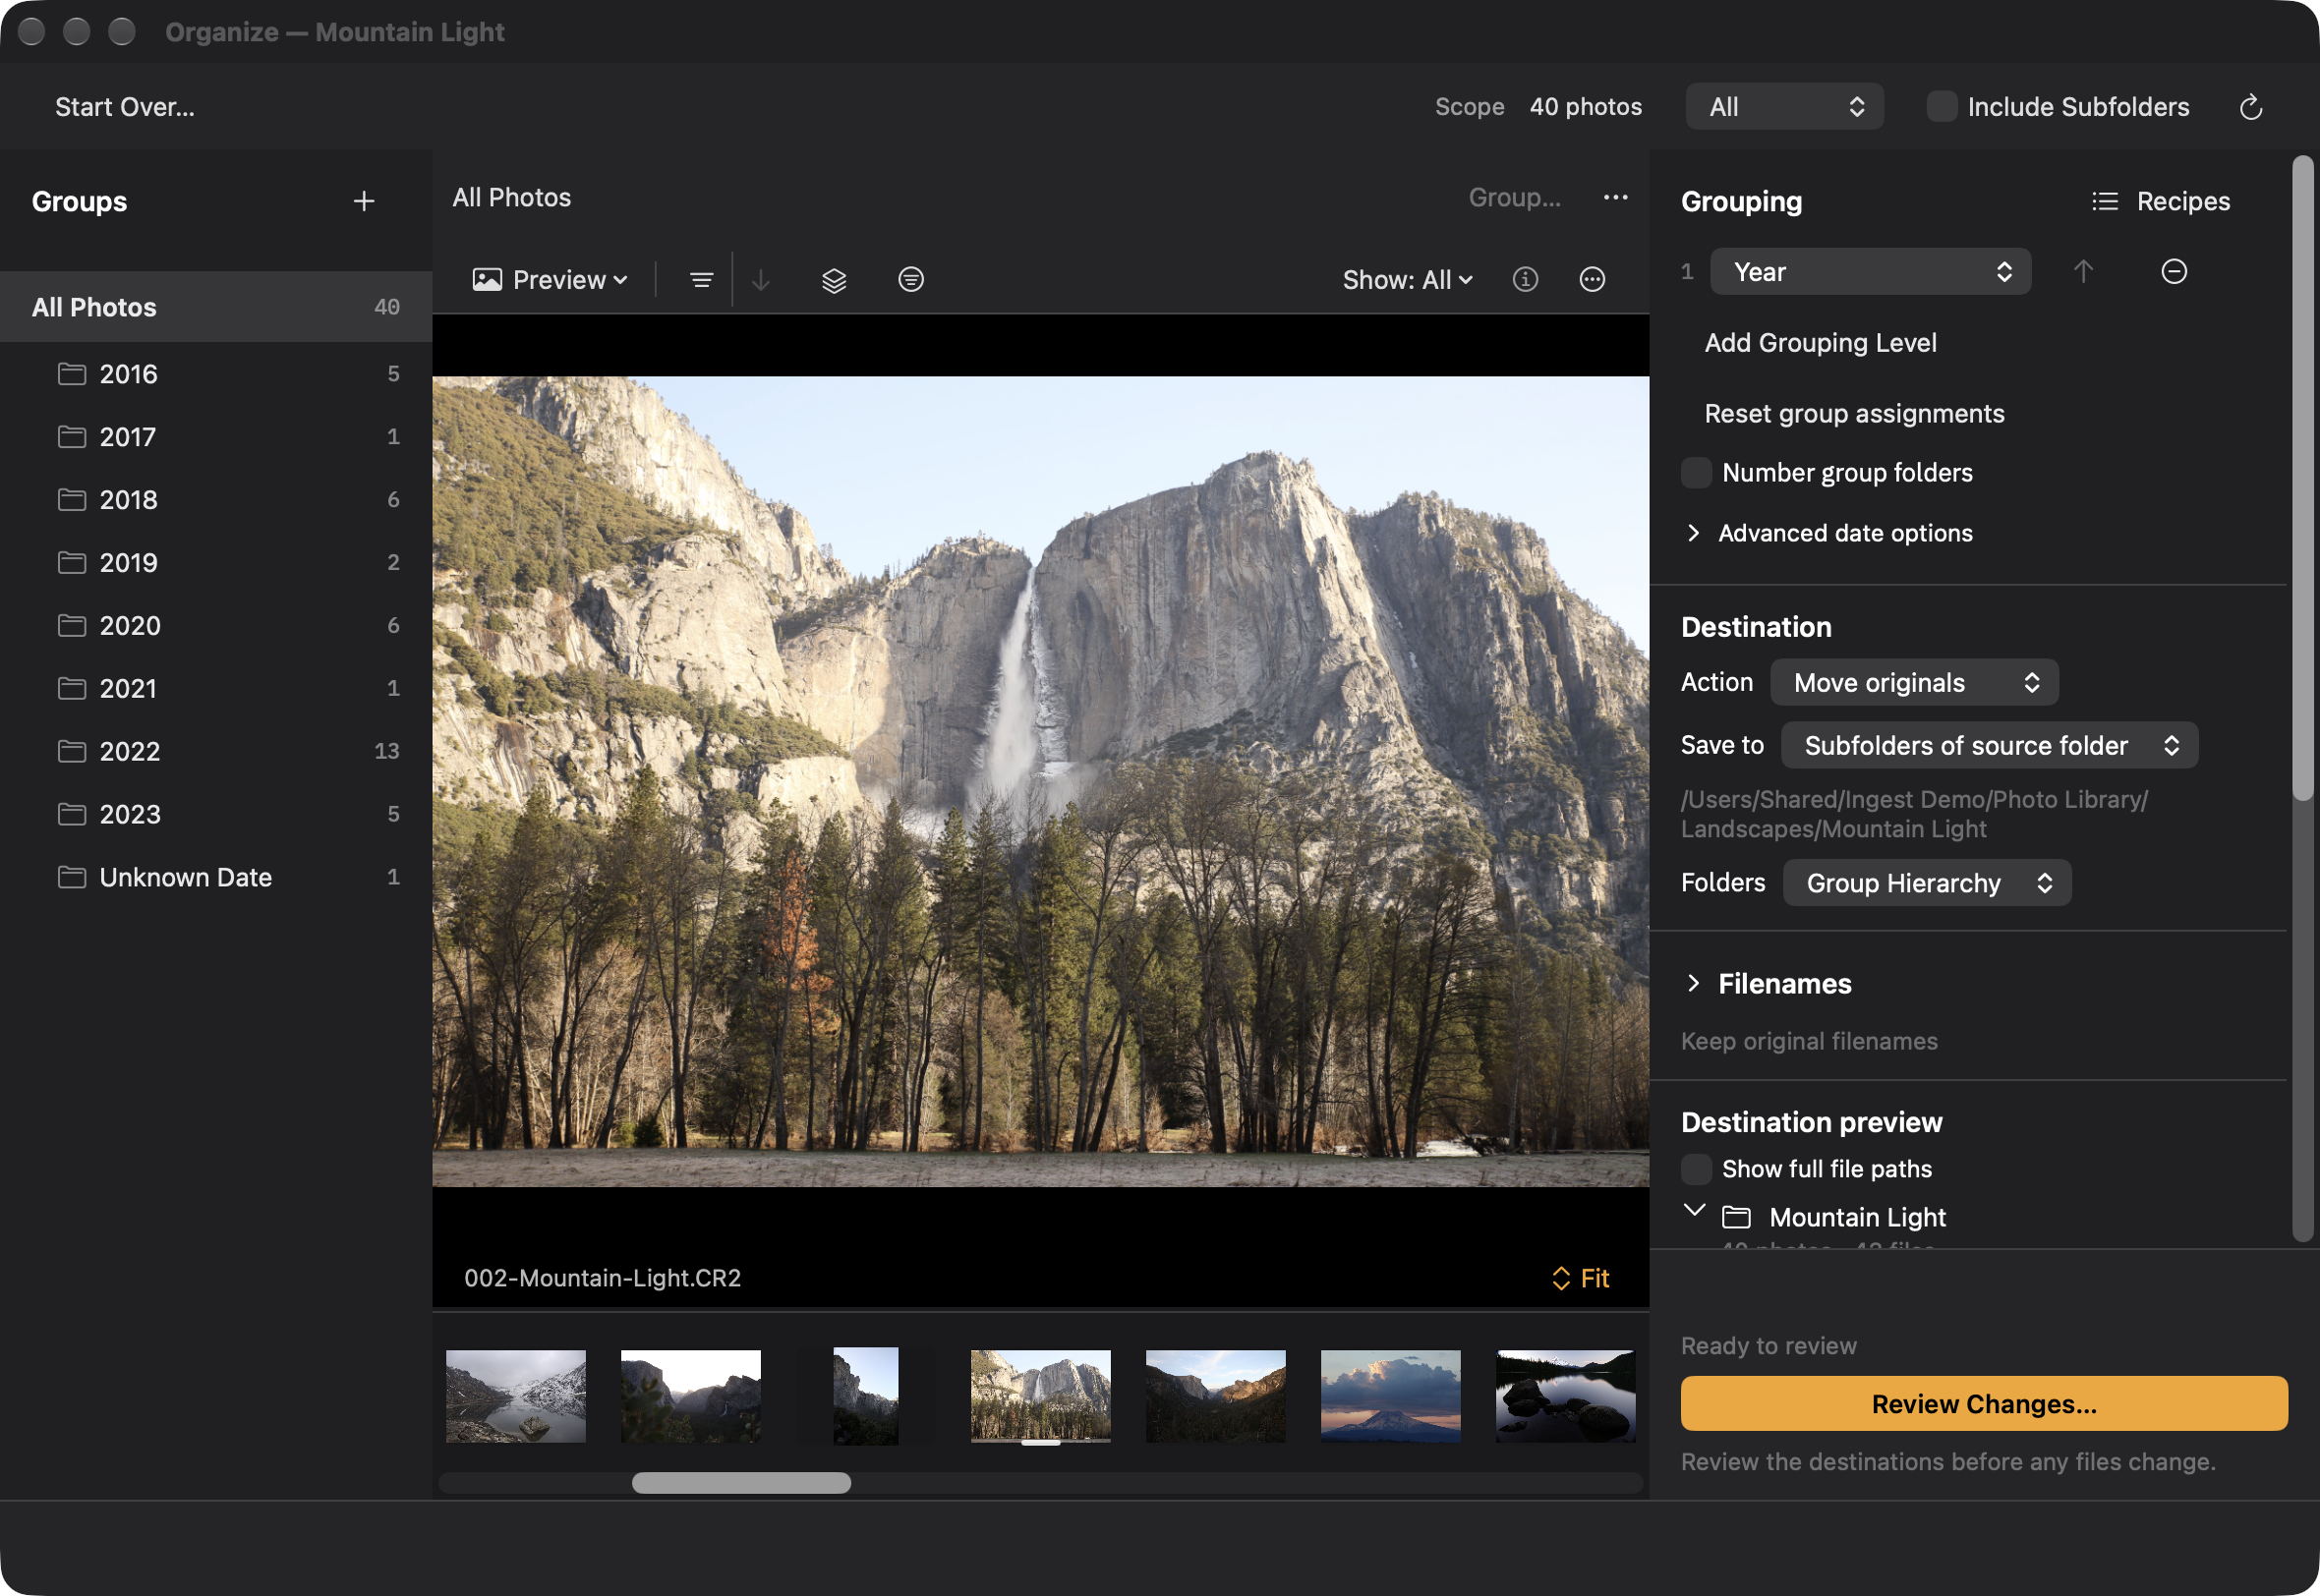
Save a recipe to reuse grouping and naming choices with another folder. Drafts and recipes stay on your Mac; recipes can travel with a settings export.
Settings
⌘, opens a window with a search field. Everything the app stores is in there with a real control: folder and app choosers instead of typed paths, pickers instead of remembered strings, live previews for templates, snippets, and splits, and drag to reorder wherever the order decides a number key.
Settings apply as you edit them. Supported settings changes can be undone with ⌘Z while the window is open. Settings, Advanced exports the whole configuration as one file to carry to another Mac, described on the automation page.
There is one row that is not a setting. On the Browsing page, Memory cards are never modified has a lock beside it instead of a switch. It is listed so that the rule is visible, not so that it can be turned off.
Keywords
Keywords are descriptive words or phrases, separate from the on/off review tag. Ingest builds keyword suggestions from photographs it has read. Folders record their keywords as they are read, and the Photos library is read in full after it connects, so a keyword that exists only in Photos can appear in a folder’s keyword suggestions without opening Apple Photos. Photos keywords need macOS 27.
Settings → Keywords lists known keywords with their Photos counts and folder locations. Select one or more and rename, merge, change case, unify spellings, remove from suggestions, or delete. Every change shows a preview first: how many photographs in Photos, how many files in each open folder, and how many files sit in folders that are not open, which keep the old spelling until you open them. Photos is changed in batches and a failed batch is reported without stopping the rest; open folders go through the verified metadata path and sit in Undo, and the receipt offers Revert.
Social Export
Select still photos in Browse and choose Send to Social Export… from File, the Command Palette, or the photo context menu, or press ⇧⌘E. The independent editor lets you create a new project or add the selection to an existing one. New frames follow visible photo order. Videos are excluded and a combined RAW/JPEG pair counts as one photo.
Choose File → Social Export… to open the editor or return to your saved project without adding photos. When Browse has a selection, New from Selection and Add to This Project make the choice explicit. Closing the window saves its draft; only Export… writes finished images.
Each photo starts in its own frame. Choose Single, Pair, Row, Stack, or Grid and the arrangement updates immediately. Change the number of photos, columns, direction, or equal/proportional sizes as needed. Remaining photos stay in a partially filled final frame. ⌘Z undoes the arrangement.
Use All Frames to change the whole project, This Frame for individual appearance, or click a photo to adjust its crop. Margins, borders, backgrounds, and Fill crops update while you move their sliders. One undo reverses a gesture. Drag frames to reorder them, drag photos between frames, or use the Reorder menu and Move to New Frame. Frame-specific appearance remains independent of project-wide changes.
Choose Fit or Fill, drag a photo within its cell, and adjust its zoom. A Fill crop starts centered on the photo’s subject (the people, else the main subject) until you move it; Reset Photo returns there. Thirds lines appear while you drag, and with a photo selected the arrow keys nudge it by one exported pixel, ⇧ for ten. Grid cells can have common or custom aspect ratios independent of the canvas. Add text layers with fonts, alignment, colors, and backgrounds; Copy Design to All Frames optionally includes the wording.
The Guides menu offers snapping for photos and text, a Stories safe-area guide on 9:16 canvases that follows Meta’s March 2026 safe zone (approximate), and an Instagram grid preview that shades what the profile grid’s 3:4 thumbnail hides. A 3:4 frame shows whole in the grid. Guides are never exported.
Starter presets come framed (Instagram Post, Square, and Story, on a blurred background) and full bleed in every Instagram shape: 3:4, 4:5, Square, Story, and Landscape 1.91:1, all 1440 wide. Your own presets are never changed when new starters arrive.
Click Export… or press ⌘E inside Social Export. Choose the folder, output width, JPEG or PNG, JPEG quality, and Sharpen for Screen (Off, Low, Standard, High) in the export sheet. Sharpening restores detail lost when a large photo is reduced and applies to photos only, never to borders, text, or backgrounds. Save Beside Original Photos selects the originals’ actual folder when all sources share a writable, non-card folder. New projects use that folder and
{base}_socialnames by default. Mixed-folder selections, Apple Photos assets, and unavailable source folders require a destination. Saved projects keep their choices; existing files are never overwritten. The sheet shows the actual path, final filenames, dimensions, and an estimated size for each file before saving.Photos are not enlarged unless you turn on Allow Enlarging: a frame whose photos lack the pixels for the chosen width exports smaller, and the sheet shows those sizes in orange with the photo that set them. The sheet also notes when a carousel made from the export would change, because it has more than 20 slides or frames in a different shape from the first slide, which Instagram crops to match. Press Z to see the exported file at 100%, after sharpening and JPEG compression.
Width 1080 with a 4:5 frame produces 1080 × 1350; a 9:16 Story produces 1080 × 1920. Single-photo filenames default to
Photo_social.jpg; the chosen output format supplies the extension. If you need a different pattern, expand Custom Naming; the naming reference explains each token. Existing files are preserved, cancellation keeps completed exports, and Review Retry includes only unfinished frames.Projects save automatically. Rename or duplicate them, or right-click or swipe to Archive or Delete. Use Select for bulk cleanup. Projects archive after seven inactive days and move to macOS Trash after thirty days total inactivity. Keep protects a project from automatic cleanup. Opening an archived project restores it and restarts the clock. Open projects are protected, and projects from an older version receive a fresh grace period.
Cleanup affects saved project files only. Your original photos, exported images, and shared presets stay untouched. Use Locate or Refresh when a source moves or changes. Presets include appearance and output size/format, and chosen background images travel with settings exports.
Outputs use sRGB and embed its color profile. Single-photo exports retain capture date, camera, lens, and credits, with GPS excluded unless enabled. Collages retain only shared creator/copyright. Export destinations cannot be on a memory card.